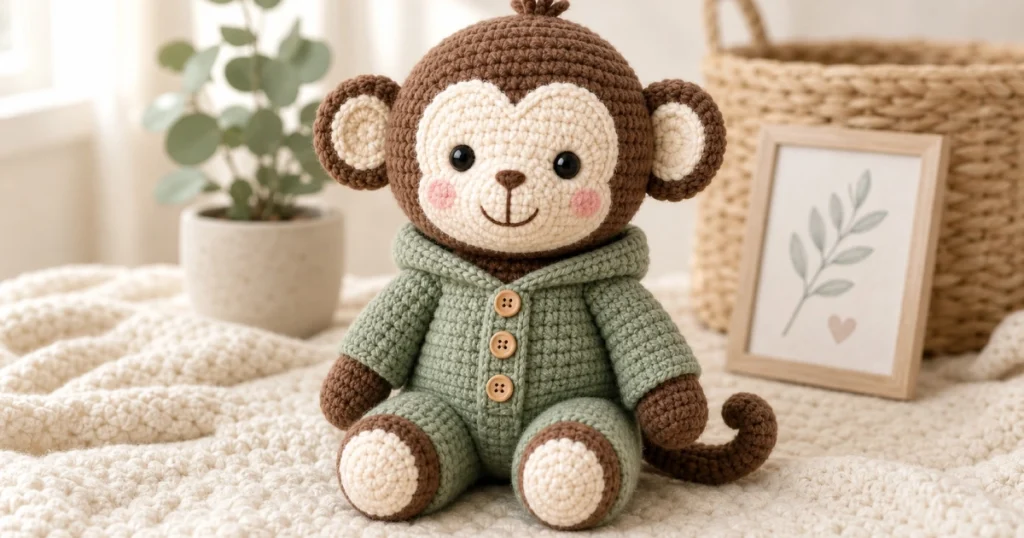
Monkey Crochet Pattern
This little monkey is the kind of project that looks fussy in the photo and turns out to be very doable once you split it into parts. He sits about 24 cm (9.5 in) tall, with a rounded brown head, a soft cream face, two big round ears, and a sage green hooded onesie that you crochet straight onto the body. The three wooden buttons down the front are the detail that pulls the whole look together.
If you are slowly building a shelf of crochet animal friends, he makes a nice addition. He works up in plain single crochet, so there are no tricky stitches to learn, and the shaping is all standard increases and decreases. That makes him a good pick for a confident beginner, and an easy afternoon or two for anyone further along. Patterns like this one are some of the most searched free crochet patterns for a reason: they are quick, forgiving, and the finished toy actually looks like the picture.
Everything you need is below, written out round by round in US terms, with a materials list, an abbreviations table, finishing notes, and answers to the questions people ask most.
Why You’ll Like This Crochet Animal
- It uses only basic stitches, so the focus stays on shaping rather than counting complicated rows.
- The onesie, hood, and buttons are worked as part of the make, so there is no separate doll clothing to sew.
- The color blocks (brown body, cream face and soles, green outfit) are simple to follow and forgiving if your tension shifts.
- It is sized for hugging. A 9 to 10 inch sitting toy is sturdy enough for a child and quick enough to repeat as a gift.
Materials & Tools You’ll Need
- Worsted weight (medium / category 4) yarn in these colors:
- Brown, roughly 60 g (head, ears, arms, hands, feet detail, tail)
- Cream, roughly 25 g (face, inner ears, foot soles)
- Sage green, roughly 45 g (onesie body, sleeves, legs, hood)
- A small amount of dark brown for the nose and mouth
- Crochet hook: 3.5 mm (E/4) or 4 mm (G/6). Use a hook a size or two smaller than the yarn band suggests so the stuffing does not show through.
- Safety eyes: 2, around 10 to 12 mm, black
- Wooden buttons: 3, around 15 mm, for the front of the onesie
- Polyester fiberfill for stuffing
- Stitch marker to track the start of each round
- Yarn needle for sewing and embroidery
- Scissors
- Optional: a pink colored pencil, cosmetic blush, or scrap of pink yarn for the cheeks
- Optional: a pipe cleaner to hold the curl in the tail
Abbreviations (US Terms)
This pattern uses US crochet terminology.
| Abbreviation | Meaning |
|---|---|
| MR | magic ring |
| sc | single crochet |
| inc | increase (2 sc in the same stitch) |
| dec | decrease (single crochet 2 stitches together) |
| st(s) | stitch(es) |
| ch | chain |
| Rnd | round |
| ( ) | stitch count at the end of the round |
| [ ] x N | repeat the steps in brackets N times |
Notes & Gauge
- Work in a continuous spiral. Do not join rounds unless the instructions say so. Move your stitch marker up as you go.
- Gauge is not critical for a toy, but aim for a tight fabric with no gaps. If you can see stuffing through the stitches, go down a hook size.
- Finished size is about 24 cm (9.5 in) sitting, using worsted yarn and a 4 mm hook. A thinner yarn and smaller hook will give you a smaller monkey.
- Skill level: confident beginner. If you can make a magic ring and read a stitch count, you can make this.
- Stuff firmly as you close each piece. Under-stuffed amigurumi sags at the neck and looks tired.
The Pattern
Make the pieces in any order, but the head and body are the slowest, so start there.
Head (Brown)
- Rnd 1: 6 sc in MR (6)
- Rnd 2: inc in each st (12)
- Rnd 3: [sc, inc] x6 (18)
- Rnd 4: [2 sc, inc] x6 (24)
- Rnd 5: [3 sc, inc] x6 (30)
- Rnd 6: [4 sc, inc] x6 (36)
- Rnd 7: [5 sc, inc] x6 (42)
- Rnd 8 to 15: sc in each st (42)
- Rnd 16: [5 sc, dec] x6 (36)
- Rnd 17: [4 sc, dec] x6 (30)
- Rnd 18: [3 sc, dec] x6 (24)
- Rnd 19: [2 sc, dec] x6 (18) — begin stuffing firmly
- Rnd 20: [sc, dec] x6 (12)
- Rnd 21: dec x6 (6)
Fasten off, weave the tail through the last 6 stitches, and pull closed. Set the eye placement aside until after the face is on (see Assembly).
Face (Cream)
Worked as a flat disc that sits on the front of the head.
- Rnd 1: 6 sc in MR (6)
- Rnd 2: inc in each st (12)
- Rnd 3: [sc, inc] x6 (18)
- Rnd 4: [2 sc, inc] x6 (24)
Slip stitch into the next stitch and fasten off, leaving a long tail for sewing. Do not stuff. This disc becomes the cream face.
Ears (Make 2)
Inner ear (Cream):
- Rnd 1: 6 sc in MR (6)
- Rnd 2: inc in each st (12)
Fasten off, leave a short tail.
Outer ear (Brown):
- Rnd 1: 6 sc in MR (6)
- Rnd 2: inc in each st (12)
- Rnd 3: [sc, inc] x6 (18)
Fasten off, leave a long tail. Sew the cream inner ear centered onto the brown outer ear, then flatten the outer ear ready to attach to the head.
Body / Onesie (Sage Green)
Worked from the bottom up.
- Rnd 1: 6 sc in MR (6)
- Rnd 2: inc in each st (12)
- Rnd 3: [sc, inc] x6 (18)
- Rnd 4: [2 sc, inc] x6 (24)
- Rnd 5: [3 sc, inc] x6 (30)
- Rnd 6 to 9: sc in each st (30)
- Rnd 10: [3 sc, dec] x6 (24)
- Rnd 11 to 13: sc in each st (24)
- Rnd 14: [2 sc, dec] x6 (18)
- Rnd 15 to 16: sc in each st (18)
- Rnd 17: [sc, dec] x6 (12) — stuff firmly
- Rnd 18: sc in each st (12)
Fasten off, leaving a long tail to sew the body to the head.
Arms (Make 2)
Start in brown for the hand, then change to green for the sleeve.
Brown (hand):
- Rnd 1: 6 sc in MR (6)
- Rnd 2: inc in each st (12)
- Rnd 3 to 4: sc in each st (12)
- Rnd 5: [2 sc, dec] x3 (9)
Change to Sage Green (sleeve):
- Rnd 6 to 11: sc in each st (9)
Stuff the hand lightly. Leave the sleeve flat and unstuffed. Fasten off, flatten the top, and leave a tail for sewing.
Legs / Feet (Make 2)
Start in cream for the sole, switch to brown for the foot, then green for the leg.
- Rnd 1: 6 sc in MR (6) in Cream
- Rnd 2: inc in each st (12)
- Rnd 3: [sc, inc] x6 (18)
- Rnd 4: sc in each st, changing to Brown at the start of this round (18)
- Rnd 5: sc in each st (18)
- Rnd 6: [sc, dec] x6 (12)
- Rnd 7: sc in each st, changing to Sage Green at the start of this round (12)
- Rnd 8 to 12: sc in each st (12)
Stuff the foot and lightly stuff the leg. Fasten off, leave a tail for sewing.
Tail (Brown)
- Rnd 1: 5 sc in MR (5)
- Rnd 2 to 20: sc in each st (5)
Fasten off, leave a long tail. The narrow tube curls on its own. If you want a fixed curl, slide a pipe cleaner inside before closing and bend it to shape.
Hood (Sage Green)
Worked flat in rows, then seamed.
- Ch 25.
- Row 1: sc in the 2nd ch from hook and in each ch across (24), turn.
- Rows 2 to 10: ch 1, sc in each st across (24), turn.
Fasten off, leaving a long tail. Fold the rectangle in half so the two short ends meet, and seam the top edge closed. That seam forms the back of the hood. The folded edge is the front opening that frames the face.
Top Tuft (Brown)
Cut three short lengths of brown yarn, fold each in half, and use your hook to knot them onto the very top of the head like a tiny fringe. Trim short so they stand up in a little tuft.
Assembly
Take your time pinning before you sew. Position matters more than speed here.
- Attach the face. Pin the cream disc to the front of the head, sitting slightly low so there is room for the forehead above it. Sew it down all the way around with the cream tail.
- Add the eyes. Push the two safety eyes through the cream face into the head, about 4 to 5 stitches apart, resting near the top edge of the disc. Lock the washers on the inside before you finish closing the head. If the head is already closed, work the posts in between stitches and secure firmly.
- Embroider the face. Using dark brown, stitch a small upside-down rounded nose in the center of the cream disc, then a gentle curved smile below it.
- Cheeks. Brush a little pink blush, color pencil, or a few pink stitches low on each side of the face.
- Attach the ears. Pin the flattened ears to the sides of the head, level with the eyes, and sew around the base of each.
- Join head to body. Sit the head on the narrow top of the body and sew all the way around the neckline. Add a little extra stuffing into the neck as you go so the head holds upright.
- Attach the legs. Sew both legs to the front lower edge of the body so the monkey sits flat with the feet forward.
- Attach the arms. Pin the arms to the sides of the body near the top, angled slightly down, and sew them on.
- Attach the tail. Sew the base of the tail to the lower back of the body and curl it to one side.
- Add the hood. Sew the bottom edge of the hood around the back of the head and neck so it frames the face like a real hood.
- Sew on the buttons. Stitch the three wooden buttons down the center front of the body, evenly spaced.
Tips, Substitutions & Variations
- No safety eyes? Embroider the eyes with black yarn or use black beads sewn on. For a toy going to a baby, embroidered eyes are the safest choice.
- Yarn swaps. Cotton gives crisp stitch definition and a firmer toy. Acrylic is softer and cheaper, and it is easy to find in these colors. Both work. Just keep all the yarn the same weight.
- Color changes. The brown and cream combination reads as a classic monkey, but this body shape works for plenty of other crochet animals. Swap brown for grey and you have a different critter entirely.
- Outfit color. Sage green is calm and neutral, but the onesie takes any color you like. Pick the button color to match.
- Sizing up. Hold two strands of worsted together with a 5.5 mm hook to make a larger version. The stitch counts stay the same.
- Tail control. If the curl flops, a pipe cleaner inside fixes it. Fold the sharp ends in so they cannot poke through.
Care Instructions
- Spot clean with a damp cloth and mild soap for everyday marks.
- For a deeper clean, hand wash gently in cool water and press out the excess. Do not wring, since that can pull the stuffing out of shape.
- Lay flat to dry, away from direct heat.
- Skip the machine and the dryer. Amigurumi holds its shape best with gentle handling.
Terms of Use / Copyright
You are welcome to make this monkey for yourself, for gifts, and to sell the finished items at small scale, such as craft fairs and local markets. Please credit the design as your source when you sell or share photos. Do not copy, reprint, resell, or redistribute the written pattern itself, and do not repost it as your own. The pattern text and instructions remain the property of the original designer.
FAQ
Is this monkey crochet pattern really free?
Yes. The full step by step instructions on this page are free to read and use. It sits alongside the other free crochet animal patterns on the site, so you can make the whole set without paying for any of them.
What yarn and hook should I use?
Worsted weight (category 4) yarn with a 3.5 mm or 4 mm hook gives the size shown here. Going down a hook size from what the yarn band recommends keeps the fabric tight so no stuffing peeks through.
How long does it take to make?
Most people finish in around 4 to 6 hours of crochet, plus assembly. If you are newer to amigurumi, give yourself an evening for the body pieces and another sitting for finishing.
Is this a good project for a beginner?
It is a strong second or third amigurumi project. You only need single crochet, increases, and decreases. If you can make a magic ring and follow a stitch count, you are ready.
Where can I find more amigurumi crochet patterns free of charge?
The site has a growing collection of cute animal makes, and several are free crochet patterns to download or follow on screen. Browse the animal pattern category to find more amigurumi crochet patterns free to use whenever you want a new project.