Crochet Amigurumi Patterns Free: Cute Ox Tutorial
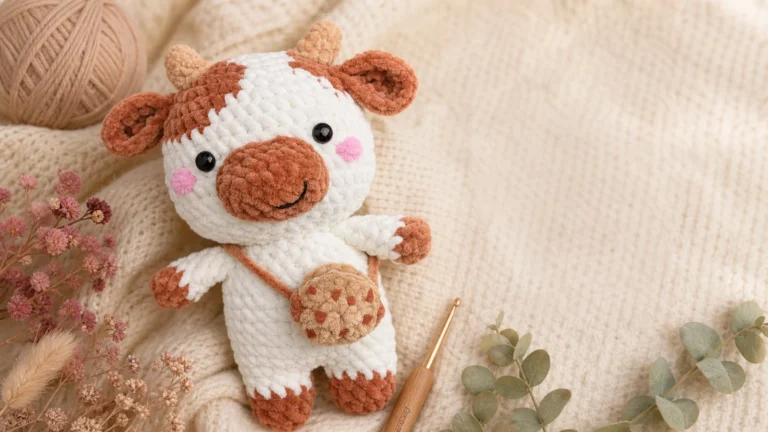
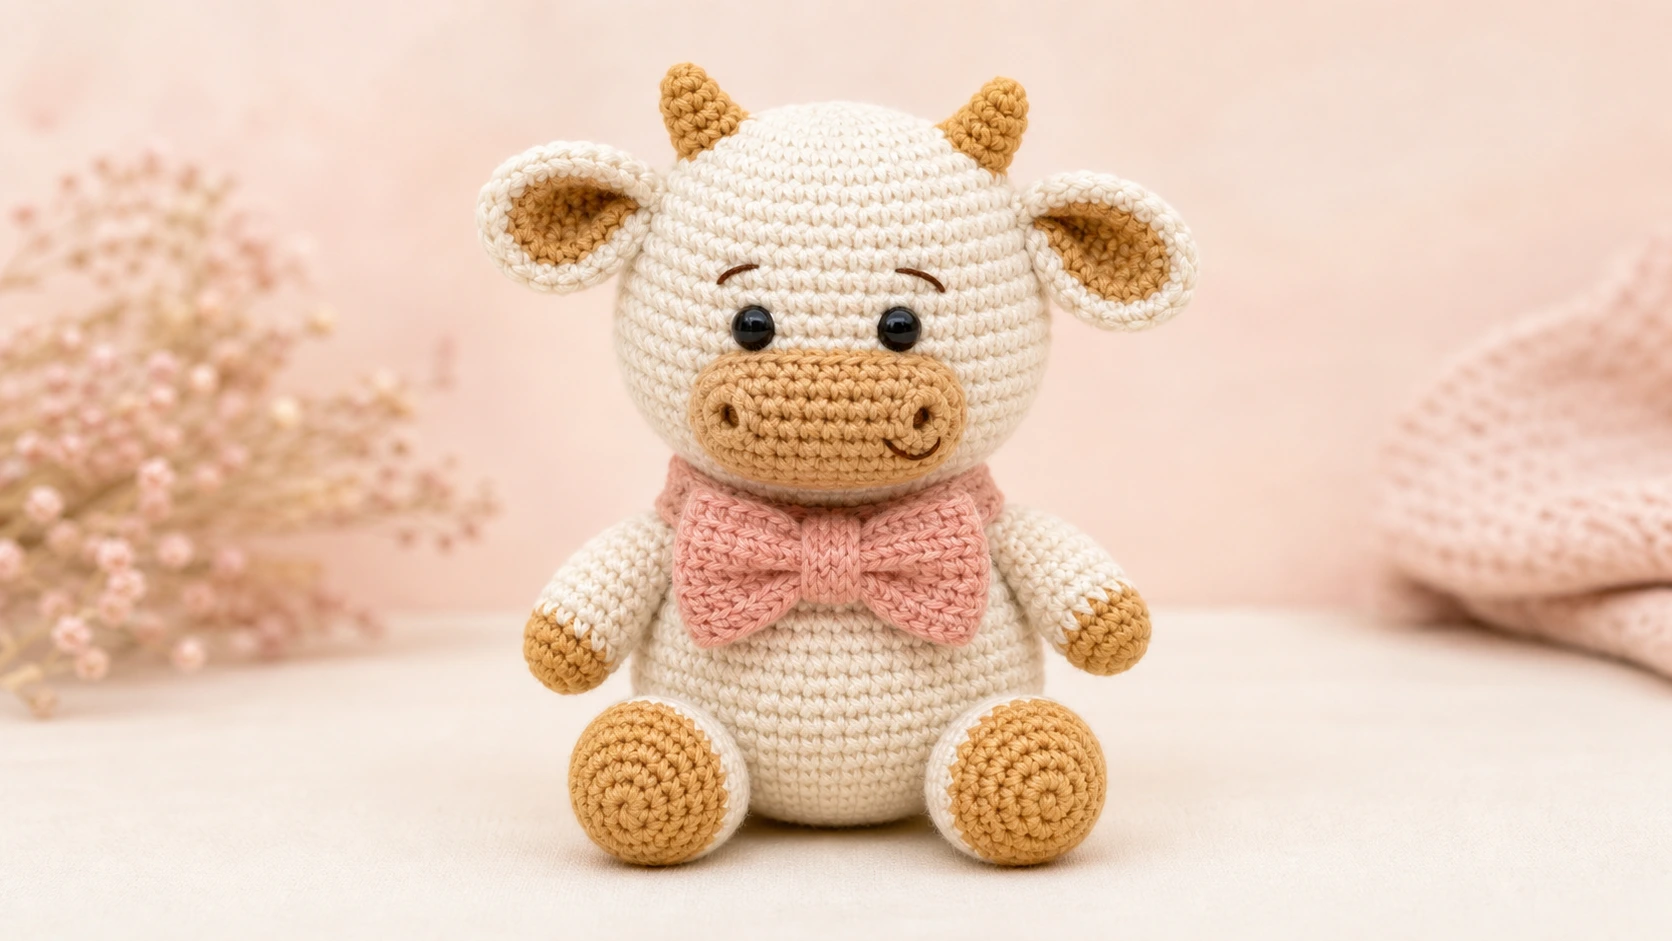
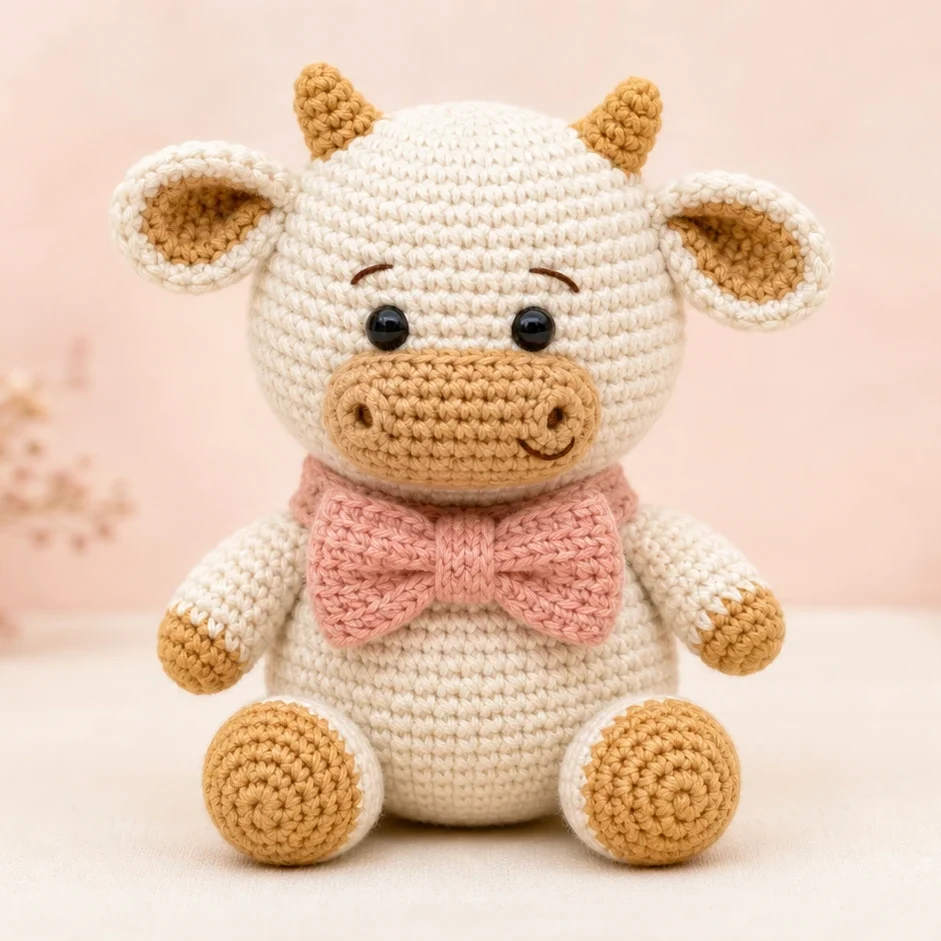
Say hello to Toffee, a soft cream ox with warm honey horns, little tan hooves, and a blush bow tied at his neck. If you like to collect crochet amigurumi patterns free to make at home, this one is worth adding to the pile. He works up quickly, uses only the most basic stitches, and forgives the odd wobbly round, which is exactly what you want when a project is meant to be relaxing.
I kept Toffee deliberately simple. The head and body are two rounded shapes, the arms and legs are short worked tubes, and the fussiest parts are the small horns and the layered ears. Both of those get a slow, clear walkthrough further down, so nothing here should catch you out.
What You’ll Need to Make Toffee
| Item | What I reached for | Where it goes |
|---|---|---|
| Main yarn (soft cream) | DK / light worsted cotton | Head, body, outer ears, tail |
| Contrast yarn (honey gold) | DK / light worsted cotton | Muzzle, horns, inner ears, hooves, feet |
| Accent yarn (blush pink) | DK / light worsted cotton | Bow, bow center, neckband |
| Hook | 4 mm (G/6) | A touch smaller than the yarn band says, for tight stitches |
| Safety eyes | 6 mm pair | Swap for embroidered eyes on a baby toy |
| Embroidery floss | Cocoa brown | Brows, nostrils, and a tiny smile |
| Fiberfill | Polyester stuffing | A small bag is plenty |
| Little extras | Stitch marker, tapestry needle, scissors | The marker saves your sanity in spirals |
You will barely dent one ball of each color. Only have worsted weight in your stash? Use it. Toffee will simply turn out a little chunkier, which is no bad thing.
Stitch Abbreviations (US Terms)
Everything below is written in US crochet terminology.
| Short | Full meaning |
|---|---|
| ch | chain |
| sc | single crochet |
| inc | increase, meaning 2 sc worked into one stitch |
| dec | decrease, meaning 2 stitches joined into one (invisible dec is neatest) |
| st(s) | stitch or stitches |
| rnd | round |
| sl st | slip stitch |
| BLO | back loop only |
Before You Start: Gauge and Sizing
- Skill level: Beginner. Magic ring, single crochet, increase, and decrease are the whole toolkit.
- Gauge: Do not stress about matching a number. What matters is a dense fabric with no peek holes. Hold your work up to the light, and if it glows, switch to a smaller hook.
- Size: Around 15 cm or 6 inches tall when he sits, using a 4 mm hook and DK cotton. Heavier yarn and a bigger hook make a bigger ox.
- How it is worked: The head, body, arms, legs, ears, horns, and tail are all made in continuous spiral rounds, so there is no joining or turning. Mark your first stitch and shift the marker up each round.
- For little ones: Leave out the plastic eyes for babies and toddlers and stitch the eyes in cocoa floss instead.
How to Crochet the Ox, Step by Step
Head (soft cream)
Begin at the crown.
- Rnd 1: 6 sc in a magic ring. (6)
- Rnd 2: inc around. (12)
- Rnd 3: (sc, inc) x6. (18)
- Rnd 4: (2 sc, inc) x6. (24)
- Rnd 5: (3 sc, inc) x6. (30)
- Rnd 6: (4 sc, inc) x6. (36)
- Rnd 7: (5 sc, inc) x6. (42)
- Rnd 8: (6 sc, inc) x6. (48)
- Rnds 9 to 15: sc around for 7 rounds. (48)
Set the 6 mm eyes around round 12, about 9 stitches apart. Placing them close together reads sweeter, so play with the spacing before you lock the backs on.
- Rnd 16: (6 sc, dec) x6. (42)
- Rnd 17: (5 sc, dec) x6. (36)
- Rnd 18: (4 sc, dec) x6. (30)
- Rnd 19: (3 sc, dec) x6. (24)
Begin firm stuffing now and keep topping it up as the opening shrinks.
- Rnd 20: (2 sc, dec) x6. (18)
- Rnd 21: (sc, dec) x6. (12)
- Rnd 22: dec around. (6)
Fasten off with a long tail. Run the tail through the front loops of the final 6 stitches, cinch the hole shut, and bury the end inside.
Muzzle (honey gold)
- Rnd 1: 6 sc in a magic ring. (6)
- Rnd 2: inc around. (12)
- Rnd 3: (sc, inc) x6. (18)
- Rnd 4: sc around. (18)
Sl st and leave a long tail for sewing. Keep it flat, or add only a wisp of stuffing. While the surface is still open and easy to reach, embroider two little cocoa nostrils near the top and a small curved smile just below them.
Body (soft cream)
Begin at the base.
- Rnd 1: 6 sc in a magic ring. (6)
- Rnd 2: inc around. (12)
- Rnd 3: (sc, inc) x6. (18)
- Rnd 4: (2 sc, inc) x6. (24)
- Rnd 5: (3 sc, inc) x6. (30)
- Rnd 6: (4 sc, inc) x6. (36)
- Rnds 7 to 12: sc around for 6 rounds. (36)
- Rnd 13: (4 sc, dec) x6. (30)
- Rnd 14: sc around. (30)
- Rnd 15: (3 sc, dec) x6. (24)
- Rnd 16: sc around. (24)
- Rnd 17: (2 sc, dec) x6. (18)
Stuff the body firmly, sl st, and fasten off with a long tail. Leave the round 17 opening open, since that is where the head attaches.
Arms (make 2, start honey gold, then cream)
Begin at the hoof.
- Rnd 1: 6 sc in a magic ring. (6)
- Rnd 2: (sc, inc) x3. (9)
- Rnds 3 to 4: sc around. (9)
Switch to soft cream.
- Rnds 5 to 9: sc around for 5 rounds. (9)
Add a little stuffing at the hoof end only. Pinch the opening flat and sc across 4 stitches through both layers to close. Fasten off, leave a tail.
Legs (make 2, start honey gold, then cream)
Begin at the sole of the foot.
- Rnd 1: 6 sc in a magic ring. (6)
- Rnd 2: inc around. (12)
- Rnd 3: (sc, inc) x6. (18)
- Rnds 4 to 5: sc around. (18)
- Rnd 6: (sc, dec) x6. (12)
Switch to soft cream.
- Rnds 7 to 10: sc around for 4 rounds. (12)
Stuff the foot firmly and the ankle softly. Flatten the top and sc across 6 stitches through both layers to close. Fasten off, leave a tail.
Inner ear (make 2, honey gold)
- Rnd 1: 6 sc in a magic ring. (6)
- Rnd 2: (sc, inc) x3. (9)
- Rnd 3: (2 sc, inc) x3. (12)
Sl st, fasten off, weave the tail in.
Outer ear (make 2, soft cream)
- Rnds 1 to 3: work exactly as the inner ear. (12)
Do not fasten off. Hold an inner ear behind an outer ear, wrong sides facing, cream side toward you. Working through both pieces, sc in each of the next 12 stitches to join. (12)
Fold the ear in half, ch 1, sc across 2 stitches through both sides, then sl st to lock the fold. Fasten off with a long tail. That fold is what gives the ear its soft cupped curve.
Horns (make 2, honey gold)
Begin at the point.
- Rnd 1: 5 sc in a magic ring. (5)
- Rnd 2: sc around. (5)
- Rnd 3: (sc, inc) x2, sc. (7)
- Rnd 4: sc around. (7)
- Rnd 5: (2 sc, inc) x2, sc. (9)
Sl st, fasten off, stuff very lightly, leave a tail.
Tail (soft cream)
- Rnd 1: 5 sc in a magic ring. (5)
- Rnds 2 to 8: sc around for 7 rounds. (5)
Fasten off and leave a tail. A tiny honey tuft at the tip is a cute optional touch.
Bow (blush pink)
Worked flat.
- Row 1: ch 21, sc in the 2nd ch from the hook and in each ch across. (20)
- Rows 2 to 8: ch 1, turn, sc across for 7 rows. (20)
Fasten off. Squeeze the rectangle in at the middle, then wrap a strand of blush yarn tightly around the center a few times to cinch it into a bow. Secure and hide the ends behind.
Bow center (blush pink)
Worked flat.
- Row 1: ch 6, sc in the 2nd ch from the hook and in each ch across. (5)
- Rows 2 to 4: ch 1, turn, sc across. (5)
Fasten off with a long tail. Wrap this strip over the cinched middle of the bow and sew the ends together at the back to cover the wrapped yarn.
Neckband (blush pink)
Worked flat.
- Row 1: ch 26, sc in the 2nd ch from the hook and in each ch across. (25)
- Row 2: ch 1, turn, sc across. (25)
Fasten off, leave a long tail for sewing.
Putting Toffee Together
Pin first, admire, then sew. Amigurumi faces live or die by a couple of millimeters, so it pays to look before you stitch.
- Muzzle onto the face. Sit the muzzle low and centered, just beneath the eyes. Sew all the way around with the honey tail, slipping in a pinch of stuffing before the last gap closes so it sits gently proud.
- Head onto the body. Balance the head on the body opening and whip stitch around, feeding a little extra stuffing into the neck as you close it so the head holds itself up.
- Ears onto the head. Sew the folded base of each ear to the sides of the head, about level with the eyes, tilted out and slightly down. The honey inner ear should face front.
- Horns onto the head. Set the horns just above and inside the ears. Anchor each with a tight ring of stitches around the base.
- Arms onto the body. Attach the flat tops to the upper body near the neck, roughly 7 stitches apart across the front, angled a little forward.
- Legs onto the body. Sew the flat edges to the front base so Toffee sits steady. A few extra stitches up the sides keep the legs from splaying.
- Tail onto the body. Sew it low and centered on the back.
- Bow and neckband. Wrap the neckband around the neck, join the ends at the back, then sew the bow to the front center and tack down its wings so it lies flat.
- Eyebrows. Using one strand of cocoa floss, work a short straight stitch above each eye, tilted gently inward. Keep it small. This tiny detail sets his whole expression.
[Maker’s note: share anything here that gave you trouble, like getting the ears even or the head to stay upright. Small honest fixes help the next maker more than perfect prose.]
Swaps, Fixes, and Fun Variations
- Use what you have. Any DK or worsted yarn works. Cotton keeps the stitches crisp, acrylic is soft and cheap, and a chenille yarn gives a plush, huggable finish, though counting stitches in it takes patience.
- Make him giftable for babies. Skip the safety eyes and embroider the eyes in cocoa floss so there is nothing that can come loose.
- Add a jingle. A small craft bell tucked inside the body before you close it turns Toffee into a soft rattle. Make sure it is well enclosed.
- Scale him up or down. Worsted yarn with a 5 mm hook gives a bigger ox. Fine 4 ply cotton with a 2.5 mm hook makes a keychain size.
- Stuff with intent. Firm through the head and body, softer in the limbs so they still flex. Under stuffed amigurumi sags and shows gaps.
- Recolor freely. The blush bow is only a suggestion. Sage green, muted mauve, or honey gold all look lovely against the cream body.
How to Keep Your Ox Looking New
Wipe small marks away with a damp cloth and a dab of mild soap. When Toffee needs a proper clean, hand wash him gently in cool water, press the water out in a towel rather than wringing, and lay him flat to dry away from heat. If you used plastic safety eyes, keep him well clear of the dryer.
Pattern Terms and Copyright
This is an original Latifacha design. You are free to make Toffee for yourself, for gifts, and to sell the finished toys you crochet from it. A friendly credit to Latifacha when you sell or post your makes is always appreciated.
Please do not copy, republish, translate, or repackage the written pattern, and please do not pass it off as your own work. Linking to this page to share it is very welcome. Need anything? Email contact@latifacha.com.
Questions Makers Ask
Are these crochet amigurumi patterns really free to use?
Yes. The whole tutorial on this page is free to follow. Make Toffee as often as you like for yourself, for gifts, or to sell the finished toys.
Which yarn weight suits this ox best?
DK or light worsted cotton with a 4 mm hook gives the size shown. Any similar weight yarn works. Going one hook size smaller than your yarn band suggests keeps the fabric tight so no stuffing shows.
I am new to amigurumi. Can I still make this?
Absolutely. If you can work a magic ring, single crochet, increase, and decrease, you already know every stitch used. The horns and joined ears are the only detailed steps, and both are explained slowly above.
What size does the finished ox come out?
About 15 cm or 6 inches tall sitting, with a 4 mm hook and DK cotton. Heavier yarn and a larger hook make him bigger, while thinner yarn and a smaller hook make a mini version.
Am I allowed to sell the toys I make?
Yes, selling your finished handmade toys is fine. Please do not resell or share the written pattern itself. A quick credit to Latifacha when you sell your makes is kindly appreciated.