Bunny Crochet Pattern Free: A Stacking Ring Toy
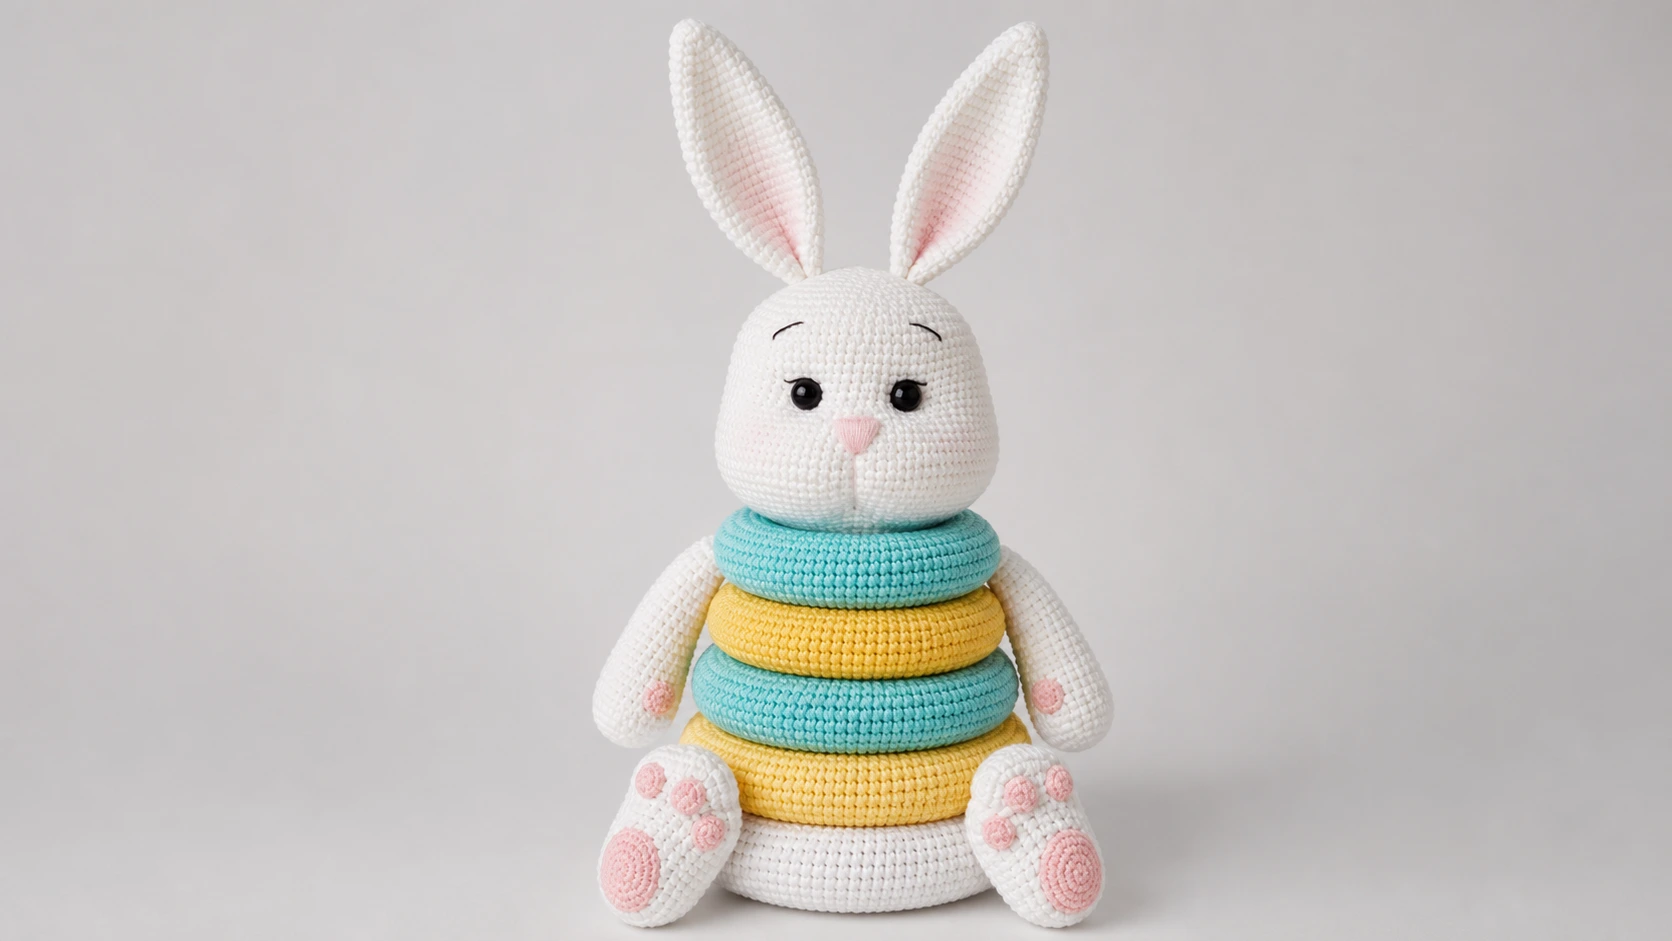
If you want a handmade baby gift that is playful and practical at the same time, this bunny crochet pattern free is a real winner. You make a soft stacking toy shaped like a sitting bunny, built from a weighted base and a set of colorful rings that stack up to form the body, topped with a sweet bunny head, arms, legs, and long ears. Little hands can take the rings off and put them back on, which makes it a toy a baby actually grows with.
It is a bigger project made of several pieces, but every piece is worked in simple single crochet, so it is more time than difficulty. Read the whole pattern through once so you understand how the base and rings nest together, then gather your cotton yarn and settle in.
What You Will Make
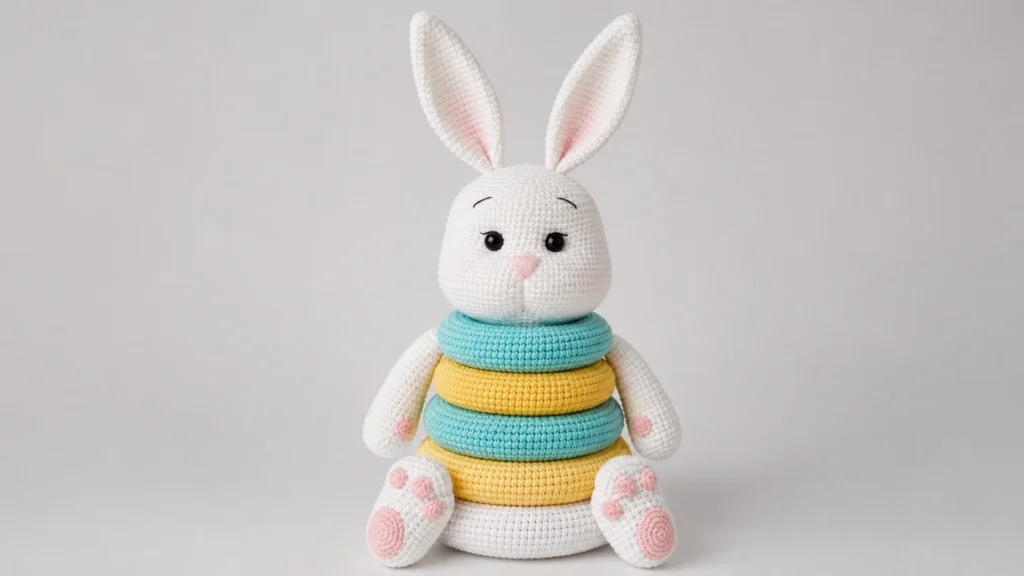
This is a stacking toy in the shape of a bunny. The base is a rounded, weighted dome that the rings sit over, the large, middle, and small rings stack up in bright stripes, and the arms attach to the small ring so the bunny keeps its shape. The head is a separate stuffed amigurumi with long ears, a shaped face, and a pom-pom tail. Worked in cotton yarn, it holds crisp stitches and bold colors.
Quick facts:
- Skill level: Intermediate, mostly for the number of pieces
- Finished size: A tall sitting bunny stacker (varies with yarn and hook)
- Time to make: Several sessions, this is a multi-part toy
- Construction: Weighted base, three stacking rings, arms, legs, and a stuffed head
Materials You Will Need
- Cotton yarn (the original uses Alize Cotton Gold):
- white as the main color
- pink for accents
- turquoise for the ring stripes
- yellow for the ring stripes
- 3 mm crochet hook (or to suit your yarn)
- Fiberfill stuffing
- Safety eyes
- Tapestry needle
- Scissors
- A little weight for the base if you want it to sit steady (optional)
Abbreviations
This bunny crochet pattern free uses US crochet terms.
- MR — magic ring
- ch — chain
- sl st — slip stitch
- sc — single crochet
- inc — increase, 2 sc in one stitch
- dec — decrease
- BLO — back loop only
- FLO — front loop only
- ( … ) * n — repeat the bracket n times
- ( n ) — the stitch count for that round
Work in a continuous spiral and keep your stitches tight so the stuffing and any weight stay hidden.
How to Crochet the Bunny Stacking Toy, Step by Step
Base
With white yarn.
- R1: 6 sc in MR (6)
- R2: 6 inc (12)
- R3: 12 sc (12)
- R4: (1 sc, inc) * 6 (18)
- R5–6: 18 sc (18)
- R7: (2 sc, inc) * 6 (24)
- R8–10: 24 sc (24)
- R11: (3 sc, inc) * 6 (30)
- R12–15: 30 sc (30)
- R16: (4 sc, inc) * 6 (36)
- R17–21: 36 sc (36)
- R22: (5 sc, inc) * 6 (42)
- R23–28: 42 sc (42)
- R29: (6 sc, inc) * 6 (48)
- R30–36: 48 sc (48)
- R37: (7 sc, inc) * 6 (54)
- R38–45: 54 sc (54)
- R46: (8 sc, inc) * 6 (60)
- R47: FLO (9 sc, inc) * 6 (66)
- R48: 5 sc, inc, (10 sc, inc) * 5, 5 sc (72)
- R49: (11 sc, inc) * 6 (78)
- R50: 6 sc, inc, (12 sc, inc) * 5, 6 sc (84)
- R51: (13 sc, inc) * 6 (90)
- R52: 7 sc, inc, (14 sc, inc) * 5, 7 sc (96)
- R53: (15 sc, inc) * 6 (102)
- R54: 8 sc, inc, (16 sc, inc) * 5, 8 sc (108)
- R55: (17 sc, inc) * 6 (114)
- R56–62: 114 sc (114)
- R63: (17 sc, dec) * 6 (108)
- R64: 8 sc, dec, (16 sc, dec) * 5, 8 sc (102)
- R65: (15 sc, dec) * 6 (96)
- R66: 7 sc, dec, (14 sc, dec) * 5, 7 sc (90)
- R67: (13 sc, dec) * 6 (84)
- R68: 6 sc, dec, (12 sc, dec) * 5, 6 sc (78)
- R69: (11 sc, dec) * 6 (72)
- R70: 5 sc, dec, (10 sc, dec) * 5, 5 sc (66)
- R71: (9 sc, dec) * 6 (60)
- R72: connect round 71 to round 47 (BLO) with 60 sc (60), filling with stuffing as you go, then keep working in rounds
- R73: (8 sc, dec) * 6 (54)
- R74: (7 sc, dec) * 6 (48)
- R75: (6 sc, dec) * 6 (42)
- R76: (5 sc, dec) * 6 (36)
- R77: (4 sc, dec) * 6 (30)
- R78: (3 sc, dec) * 6 (24)
- R79: (2 sc, dec) * 6 (18)
- R80: (1 sc, dec) * 6 (12)
- R81: 6 dec (6). Cut the yarn, pull the hole closed, and hide the tail.
Legs (Make 2)
With white yarn, ch 11 and work in rounds.
- R2: 9 sc, 4 sc in one st, 9 sc (22)
- R3: inc, 8 sc, 4 inc, 8 sc, inc (28)
- R4: inc, 9 sc, 8 inc, 9 sc, inc (38)
- R5: 1 sc, inc, 13 sc, 8 inc, 15 sc (47)
- R6–11: 47 sc (47)
- R12: 16 sc, 8 dec, 15 sc (39)
- R13: 12 sc, 8 dec, 7 sc, 2 dec (29)
- R14: 2 dec, 8 sc, 4 dec, 7 sc, dec (22)
Fill with stuffing.
- R15: dec, 8 sc, 2 dec, 7 sc, dec (18)
- R16: 18 sc (18)
Cut the yarn and leave a tail for sewing. Sew as shown to form the toes.
Toes (Make 6, three per foot) and Feet (Make 2)
For each toe, work 6 sc in MR and fasten off. For each foot, use pink yarn:
- R1: 6 sc in MR (6)
- R2: 6 inc (12)
- R3: (1 sc, inc) * 6 (18)
- R4: (2 sc, inc) * 6 (24)
Fasten off, leaving tails to sew the feet and toes to the legs. Sew the legs to the base.
Large Ring
With white yarn.
- R1: 60 ch, sl st in the first ch (60)
- R2: (9 sc, inc) * 6 (66)
- R3: 5 sc, inc, (10 sc, inc) * 5, 5 sc (72)
- R4: (11 sc, inc) * 6 (78)
- R5: 6 sc, inc, (12 sc, inc) * 5, 6 sc (84)
- R6: (13 sc, inc) * 6 (90)
- R7: 7 sc, inc, (14 sc, inc) * 5, 7 sc (96)
- R8: (15 sc, inc) * 6 (102)
- R9–15: 102 sc (102)
- R16: (15 sc, dec) * 6 (96)
- R17: 7 sc, dec, (14 sc, dec) * 5, 7 sc (90)
- R18: (13 sc, dec) * 6 (84)
- R19: 6 sc, dec, (12 sc, dec) * 5, 6 sc (78)
- R20: (11 sc, dec) * 6 (72)
- R21: 5 sc, dec, (10 sc, dec) * 5, 5 sc (66)
- R22: (9 sc, dec) * 6 (60)
Sew round 22 to round 1, filling with stuffing as you go.
Middle Ring
Start with turquoise yarn.
- R1: 48 ch, sl st in the first ch (48)
- R2: (7 sc, inc) * 6 (54)
- R3: 4 sc, inc, (8 sc, inc) * 5, 4 sc (60)
- R4: (9 sc, inc) * 6 (66)
- R5: 5 sc, inc, (10 sc, inc) * 5, 5 sc (72)
- R6: (11 sc, inc) * 6 (78)
- R7: 6 sc, inc, (12 sc, inc) * 5, 6 sc (84), change to yellow
- R8: (13 sc, inc) * 6 (90), change to turquoise
- R9–15: 90 sc (90), alternating yellow and turquoise each round for stripes
- R16: (13 sc, dec) * 6 (84)
- R17: 6 sc, dec, (12 sc, dec) * 5, 6 sc (78)
- R18: (11 sc, dec) * 6 (72)
- R19: 5 sc, dec, (10 sc, dec) * 5, 5 sc (66)
- R20: (9 sc, dec) * 6 (60)
- R21: 4 sc, dec, (8 sc, dec) * 5, 4 sc (54)
- R22: (7 sc, dec) * 6 (48)
Sew round 22 to round 1, filling with stuffing as you go.
Arms (Make 2)
Start with white yarn.
- R1: 6 sc in MR (6)
- R2: 6 inc (12)
- R3: (1 sc, inc) * 6 (18)
- R4: (2 sc, inc) * 6 (24)
- R5: 24 sc (24)
- R6: (3 sc, inc) * 6 (30)
- R7: 30 sc (30)
- R8: 3 dec, 24 sc (27)
- R9: 27 sc (27)
- R10: 3 dec, 21 sc (24)
- R11: 24 sc (24)
- R12: 3 dec, 19 sc (21)
- R13–20: 21 sc (21)
- R21: dec, 19 sc (20)
- R22–24: 20 sc (20)
- R25: 4 sc, dec, 8 sc, dec, 4 sc (18)
- R26: 5 sc, change to turquoise, 13 sc (18)
- R27: 5 sc, change to yellow, 13 sc (18)
- R28: 5 sc, change to turquoise, 13 sc (18)
- R29: 3 sc, dec, 7 sc, dec, 4 sc (16)
Fold in half and make 8 sc to close. Fasten off. For each palm, use pink yarn: 6 sc in MR, then 6 inc (12), fasten off, and sew the palms to the arms.
Small Ring
Start with turquoise yarn.
- R1: 36 ch, sl st in the first ch (36)
- R2: (5 sc, inc) * 6 (42)
- R3: 3 sc, inc, (6 sc, inc) * 5, 3 sc (48)
- R4: (7 sc, inc) * 6 (54)
- R5: 4 sc, inc, (8 sc, inc) * 5, 4 sc (60)
- R6: (9 sc, inc) * 6 (66)
- R7: 5 sc, inc, (10 sc, inc) * 5, 5 sc (72)
- R8: connect the first arm with 8 sc, then 3 sc, inc, (11 sc, inc) * 2, connect the second arm with 8 sc, 3 sc, inc, (11 sc, inc) * 2 (78)
- R9–15: 78 sc (78), alternating yellow and turquoise each round for stripes
- R16: (11 sc, dec) * 6 (72)
- R17: 5 sc, dec, (10 sc, dec) * 5, 5 sc (66)
- R18: (9 sc, dec) * 6 (60)
- R19: 4 sc, dec, (8 sc, dec) * 5, 4 sc (54)
- R20: (7 sc, dec) * 6 (48)
- R21: 3 sc, dec, (6 sc, dec) * 5, 3 sc (42)
- R22: (5 sc, dec) * 6 (36)
Sew round 22 to round 1, filling with stuffing as you go.
Head
With white yarn.
- R1: 6 sc in MR (6)
- R2: 6 inc (12)
- R3: (1 sc, inc) * 6 (18)
- R4: (2 sc, inc) * 6 (24)
- R5: (3 sc, inc) * 6 (30)
- R6: (4 sc, inc) * 6 (36)
- R7: (5 sc, inc) * 6 (42)
- R8: (6 sc, inc) * 6 (48)
- R9: (7 sc, inc) * 6 (54)
- R10: 4 sc, inc, (8 sc, inc) * 5, 4 sc (60)
- R11: (9 sc, inc) * 6 (66)
- R12: 5 sc, inc, (10 sc, inc) * 5, 5 sc (72)
- R13: (11 sc, inc) * 6 (78)
- R14–21: 78 sc (78)
Insert the safety eyes between rounds 19 and 20, about 12 stitches apart.
- R22: 57 sc, 3 inc, 18 sc (81)
- R23–25: 81 sc (81)
- R26: 39 sc, (6 sc, inc) * 6 (87)
- R27–33: 87 sc (87)
- R34: 39 sc, (6 sc, dec) * 6 (81)
- R35: 39 sc, (12 sc, dec) * 3 (78)
- R36: 78 sc (78)
- R37: (11 sc, dec) * 6 (72)
- R38: 5 sc, dec, (10 sc, dec) * 5, 5 sc (66)
- R39: (9 sc, dec) * 6 (60)
- R40: 4 sc, dec, (8 sc, dec) * 5, 4 sc (54)
- R41: (7 sc, dec) * 6 (48)
- R42: (6 sc, dec) * 6 (42)
- R43: (5 sc, dec) * 6 (36)
- R44: 36 sc (36)
- R45: BLO 36 sc (36)
- R46–48: 36 sc (36)
- R49: (4 sc, dec) * 6 (30)
- R50–51: 30 sc (30)
- R52: (3 sc, dec) * 6 (24)
- R53–54: 24 sc (24)
- R55: (2 sc, dec) * 6 (18)
- R56: 18 sc (18)
- R57: (1 sc, dec) * 6 (12)
- R58: 6 dec (6). Cut the yarn and leave a long tail for needle-sculpting the face. Stuff the head as you go.
Ears (Make 2)
With white yarn.
- R1: 6 sc in MR (6)
- R2: (1 sc, inc) * 3 (9)
- R3: 9 sc (9)
- R4: (2 sc, inc) * 3 (12)
- R5: 12 sc (12)
- R6: (3 sc, inc) * 3 (15)
- R7: 15 sc (15)
- R8: (4 sc, inc) * 3 (18)
- R9: 18 sc (18)
- R10: (5 sc, inc) * 3 (21)
- R11: 21 sc (21)
- R12: (6 sc, inc) * 3 (24)
- R13: 24 sc (24)
- R14: (7 sc, inc) * 3 (27)
- R15: 27 sc (27)
- R16: (8 sc, inc) * 3 (30)
- R17–25: 30 sc (30)
- R26: (8 sc, dec) * 3 (27)
- R27–29: 27 sc (27)
- R30: (7 sc, dec) * 3 (24)
- R31–33: 24 sc (24)
Cut the yarn and leave a long tail for sewing.
Tail
With white yarn, make a pom-pom about 6 cm across and sew it to the bottom of the body.
Putting Your Bunny Stacker Together
- Base and legs: Sew the toes and pink feet to the legs, then sew the legs to the base so the bunny sits.
- Rings: Stack the large, middle, and small rings over the base to build the striped body.
- Arms: These are already joined into the small ring, so just make sure the palms are sewn on neatly.
- Head: Sew the ears to the head, then add the nose and eyebrows. Use the long tail to needle-sculpt the face for extra character.
- Tail: Sew the white pom-pom to the back of the body.
Tips for a Better Stacking Bunny
- Keep stitches tight. Cotton on a small hook gives crisp rings, and tight stitches stop the stuffing from showing.
- Stuff the rings evenly. Fill each ring as you sew it closed so they hold a round, even shape for stacking.
- Weight the base if you like. A little weight in the base helps the finished bunny sit steady for a baby to play with.
- Carry colors neatly. When you switch between turquoise and yellow, keep the loose strand loose on the inside so the stripes stay tidy.
Frequently Asked Questions
Is this bunny crochet pattern free hard to make?
It is intermediate, mostly because of the number of pieces rather than the stitches. Everything is single crochet with increases and decreases, so if you are patient and can follow rounds, you can make the whole stacker.
How does the stacking part work?
The base is a dome, and the rings slide over it and stack up to form the striped body. A baby can pull the rings off and stack them back on, which is what makes it such a good developmental toy.
What yarn is best for a stacking toy?
Cotton yarn like Alize Cotton Gold gives firm, crisp rings that hold their shape and show off the bright stripes. A firm cotton is better here than a soft plush.
Can I change the ring colors?
Yes. The white, pink, turquoise, and yellow shown here are just one option, so pick any bright cotton colors you like for the stripes.
Final Thoughts
A crochet stacking toy is that rare handmade gift that is both charming and genuinely useful, and a bunny-shaped one is hard to beat. It takes a few sessions because of all the pieces, but each ring is quick and the finished stacker is a keepsake a baby can actually play with. If you want a gift that stands out, this bunny crochet pattern free is well worth the time. Happy crocheting.