Free Crochet Patterns to Download: A Retro Camera Bag
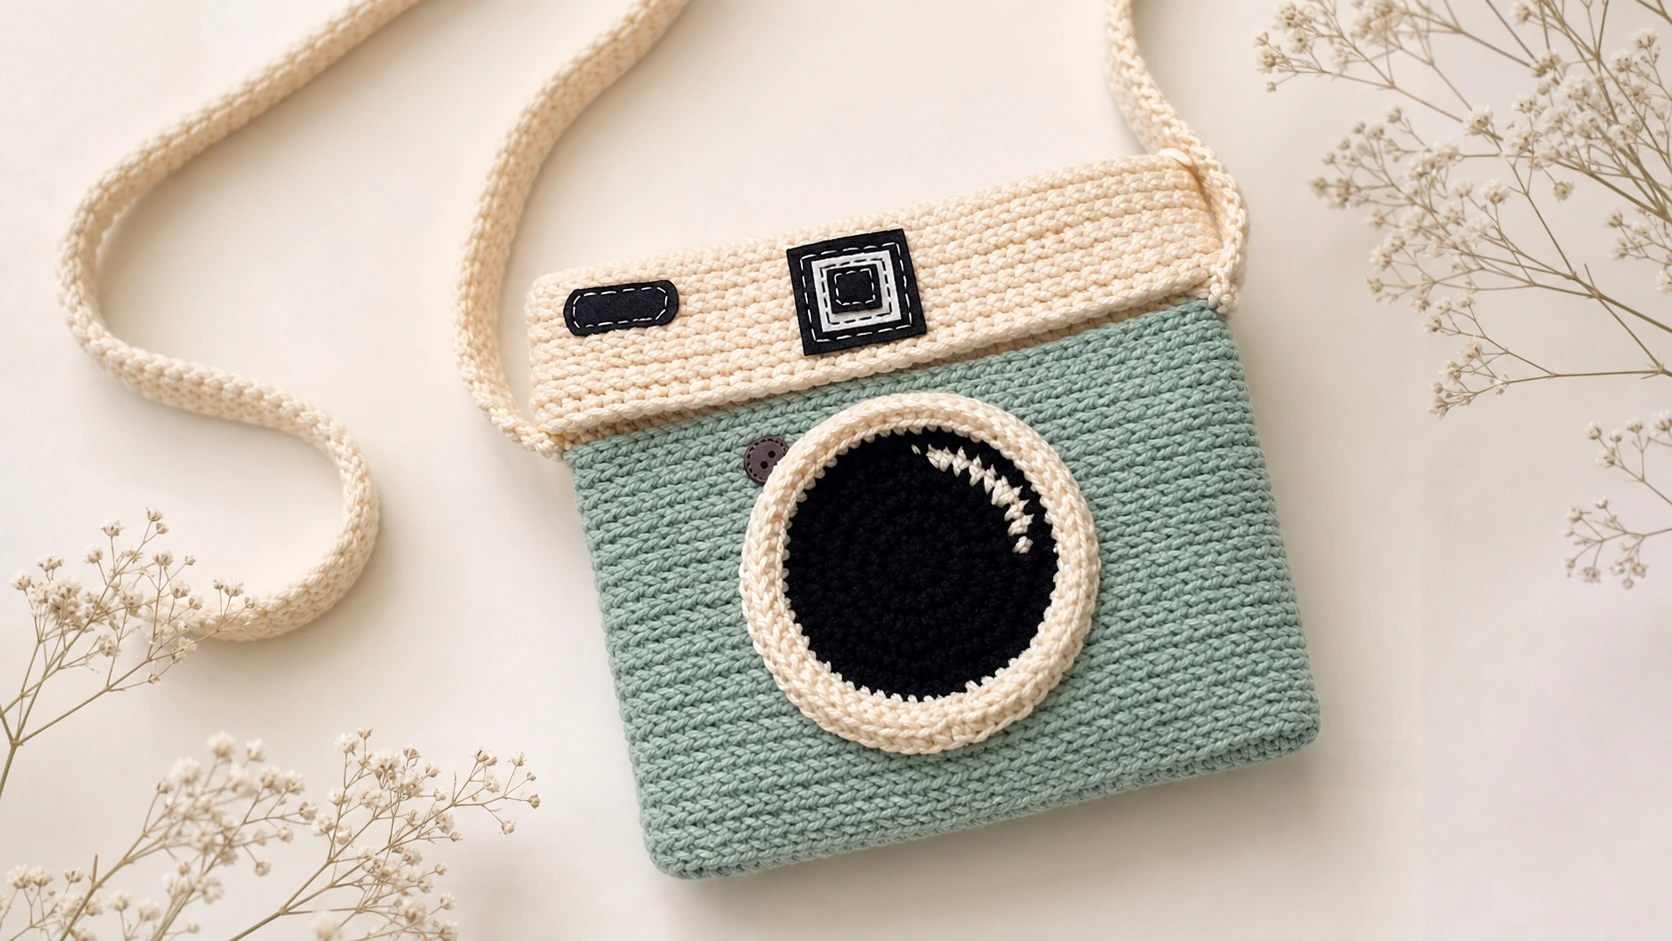
Every so often a project comes along that makes people stop and ask where you bought it — and this little camera bag is exactly that. It is a crossbody purse shaped like a vintage film camera, complete with a chunky black lens, a cream top panel, and a long shoulder strap. It is one of those free crochet patterns to download that turns a couple of skeins of yarn into a genuine conversation piece, and it is small enough to finish over a weekend.
The best part is how approachable it is. The whole bag is single crochet worked in the round, the lens is a flat spiral, and the strap is a long skinny band you can make as long as you like. If you have been hunting for free crochet patterns to download that feel special without demanding advanced skills, this camera bag hits the sweet spot. Read the pattern through once so the pieces make sense, then gather your yarn and get started.
What You Will Make
This is a structured crossbody bag about 8 inches (21 cm) square, worked in a light worsted acrylic. The main body and a matching flap cover are made in a soft sage green, the top band and lens rim are cream, and the lens center is black for that classic camera look. A long crocheted strap ties it all together, and small felt details plus a wood button finish the front. It is roomy enough for a phone, keys, and a card wallet.
Quick facts:
- Skill level: Intermediate
- Finished size: About 8 x 8 in (21 x 21 cm)
- Time to make: A weekend
- Construction: Body worked from an oval base, flat lens, top cover, and a long strap
Materials You Will Need
- 100% acrylic DK / light worsted yarn: about 80 g sage green (A) and 60 g cream (B), plus a little black
- Crochet hook 3.75–4.5 mm (US F-5, G-6, or 7)
- Black and white felt for the small camera details
- A 9-inch black zipper (or sew-on magnetic snaps)
- A wooden button, 15–20 mm
- Black and white embroidery thread
- Yarn needle and embroidery needle
- Scissors
Abbreviations
This pattern uses US terminology.
- MR — magic ring
- ch — chain
- sl st — slip stitch
- st — stitch
- sc — single crochet
- blsc — back loop single crochet
- inc — increase (2 sc in one stitch)

How to Crochet the Camera Bag, Step by Step
Bag Body (Make 1)
With color A (sage green), start from the base.
- Base: Ch 35. Work 2 sc into the 2nd ch from hook, sc in each of the next 32 ch, 3 sc in the last ch, then turn to work along the other side of the chain: sc in each of the next 33 ch, sl st to the first stitch. (70 sts)
- Round 2: Ch 1, [sc in next st, 2 sc in next st, sc in each of the next 32 sts, 2 sc in next st] twice, sl st, then sl st around, sl st to join. (74 sts)
- Rounds 3–21: Ch 1, sc around, sl st, then sl st around, sl st to join. (74 sts)
- Round 22: Change to color B (cream), blsc around, sl st. (74 sts)
- Rounds 23–24: Ch 1, sc around, sl st. Fasten off and weave in the end.
Camera Lens (Two Parts)
Lens 1 — with black yarn:
- Round 1: 9 sc in MR, sl st. (9)
- Round 2: Ch 1, inc in each st, sl st. (18)
- Round 3: Ch 1, [sc 1, inc] 9 times, sl st. (27)
- Round 4: Ch 1, [sc 2, inc] 9 times, sl st. (36)
- Round 5: Ch 1, black [sc 3, inc] twice, white [sc 3, inc] twice, black [sc 3, inc] 5 times, sl st. (45)
- Round 6: Ch 1, [sc 4, inc] 9 times, sl st. (54)
- Round 7: Change to white, ch 1, sc around, sl st. Fasten off, leaving about 30 cm to sew. (54)
Lens 2 — with white yarn: ch 54 and sl st to close into a circle. Round 1: ch 1, sc around, sl st. (54) Fasten off, leave about 30 cm, and sew Lens 2 onto Lens 1 to make the raised lens rim.
Strap (Make 1)
With color B, ch 4 (leave a 25–30 cm tail).
- Row 1: Sc in the 2nd ch from hook and in each of the next 2 sts, turn. (3)
- Rows 2–200: Ch 1, sc across, turn. (3)
Fasten off, leaving a 25–30 cm tail. You can make the strap wider (sc 3–5) or adjust the length by working more or fewer rows to suit your height.
Cover / Top Flap (Make 1)
With color B, start from the base.
- Base: Ch 35. Work 2 sc into the 2nd ch from hook, sc in each of the next 32 ch, 3 sc in the last ch, turn and work along the other side: sc in each of the next 33 ch, sl st to join. (70 sts)
- Round 2: Ch 1, [sc in next st, 2 sc in next st, sc in each of the next 32 sts, 2 sc in next st] twice, sl st, then sl st around, sl st to join. (74 sts)
- Rounds 3–8: Ch 1, sc around, sl st, then sl st around, sl st to join. (74 sts)
Fasten off, leaving about 50 cm to sew the cover to the bag.
Assembly
- Sew the small black and white felt shapes (viewfinder and button details) onto the center of the cover.
- Sew in the zipper (or attach the magnetic snaps) along the bag opening.
- Mark the lens position on the front of the bag, then sew the assembled lens firmly in place.
- Sew the cover to the top back of the bag so it folds over the opening.
- Sew the strap to the left and right sides.
- Sew the wooden button into the left of the lens area to finish the camera look.
Tips for a Better Camera Bag
- Keep stitches tight. A firm single crochet fabric holds the boxy camera shape and keeps the bag structured.
- Center the lens. Pin the lens before you sew so it sits square on the front; a crooked lens is the one thing that gives it away.
- Line it if you like. A simple fabric lining makes the bag sturdier and stops small items poking through the stitches.
- Match your gauge. Because this pattern relies on a specific size, a quick tension check keeps your camera bag true to the measurements.
Frequently Asked Questions
Are these free crochet patterns to download suitable for beginners?
They sit at the intermediate level. Every stitch is a basic single crochet, but the assembly — lens, cover, strap, and felt details — takes a little patience. A confident beginner who has finished a few projects can absolutely make it.
How do I download and save the pattern?
Once you open the pattern page, you can save or print it straight from your browser so you have it offline. Keeping the pattern on your device means you can crochet anywhere, even without a signal.
What yarn works best for a camera bag?
A DK or light worsted acrylic keeps the bag light and gives it good structure. Acrylic also holds color well, which matters for the crisp green, cream, and black contrast.
Can I make it without the zipper?
Yes. Swap the zipper for sew-on magnetic snaps or a simple button-and-loop closure under the flap. That makes it one of the more flexible bag patterns for a first make.
Final Thoughts
A crochet camera bag is proof that a small project can have big personality. It works up quickly, uses very little yarn, and ends up as an accessory people genuinely notice. If you have been scrolling through free crochet patterns to download looking for something a bit different from the usual scarves and squares, this retro camera crossbody is a joy to make and even better to carry. Happy crocheting.