Bumblebee Crochet Pattern
by Latifacha
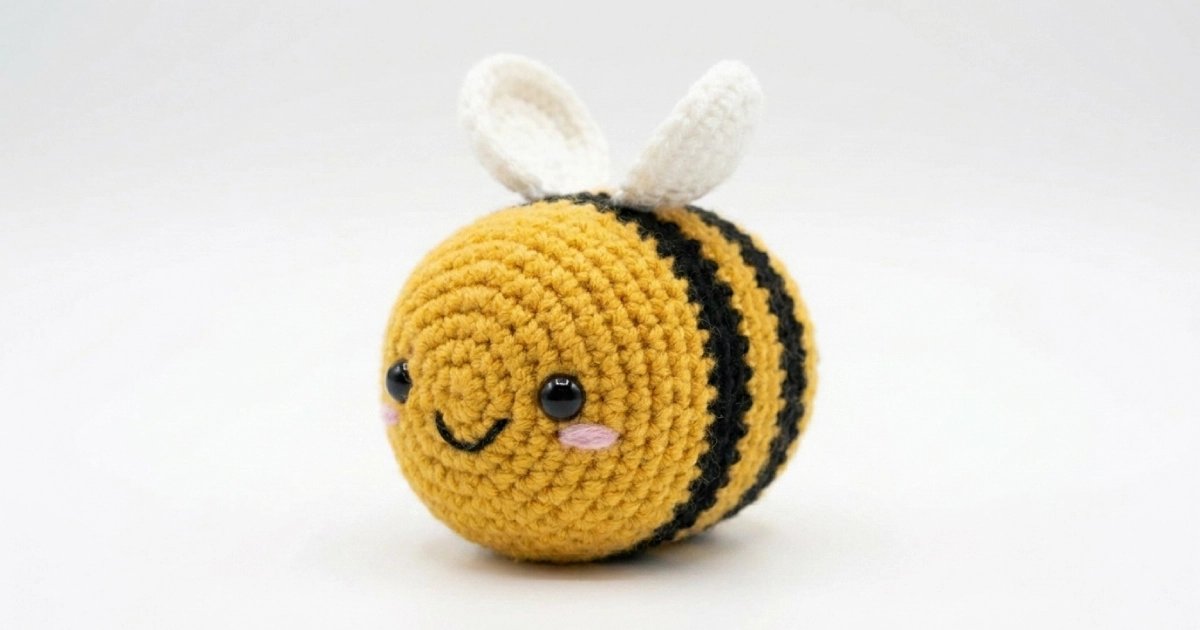
There’s something about a tiny crochet bee that makes people grin before you’ve even sewn the wings on. This little bumblebee is round, a bit chubby, and quick enough to finish in an evening, so it’s one of those makes you come back to whenever you want something fast and satisfying.
This free bumblebee crochet pattern takes you through the whole bee round by round, from the striped body to the two upright wings and the friendly embroidered face. It’s written in plain US terms with stitch counts on every round, so you always know where you are. If you’ve been saving free crochet animal patterns to try, this bee is a gentle place to start, and it uses only small amounts of yarn you probably already have in your scrap basket.
The only slightly fussy part is the color changes for the stripes, and even those are easy once you’ve done the first one. Everything else is single crochet in a spiral.
Why You’ll Like Making This Bee
Small projects like this are great for using up leftover yarn, and a finished bee makes a sweet handmade gift, a desk buddy, or a soft little toy for a baby shelf. Because the body is one continuous piece, there’s very little sewing. You attach two wings, tidy up the face, and you’re done. It’s a forgiving make if you’re newer to amigurumi, and a relaxing one if you’ve been at it for years.
Materials and Tools for This Crochet Pattern
You only need a little of each color, so this is a perfect scrap-buster.
- Yarn: Worsted weight (medium / #4) or DK in three colors — honey-gold yellow (main), black (stripes), and white (wings). A few meters of black for the wings and small amounts of yellow and black are all you need.
- Crochet hook: 3.0 mm to 3.5 mm. Go a little smaller than your yarn label suggests so the stitches stay tight and the stuffing doesn’t show through.
- Safety eyes: Two 8 mm black safety eyes (or embroider eyes with black thread for a baby-safe version).
- Black embroidery thread or yarn: for the smile and the small swirl on the cheek.
- Polyester fiberfill for stuffing.
- Stitch marker to track the start of each round.
- Tapestry needle and scissors.
- Optional: a little pink for blushed cheeks.
Finished size: about 10 cm (4 in) long with worsted yarn and a 3.0 mm hook. Using thinner yarn and a smaller hook will give you a smaller bee.
Skill level: Easy. Good for confident beginners.
Abbreviations (US Terms)
This pattern uses US crochet terminology throughout.
| Abbreviation | Meaning |
|---|---|
| MR | magic ring |
| ch | chain |
| sc | single crochet |
| inc | increase (2 sc in the same stitch) |
| dec | decrease (single crochet 2 stitches together) |
| st(s) | stitch(es) |
| rnd(s) | round(s) |
| ( ) | the number in parentheses is the total stitch count for that round |
Notes and Gauge
- The body is worked in a continuous spiral, so you won’t join or turn at the end of each round. Move your stitch marker up as you go.
- Gauge isn’t critical for a toy like this. What matters is that your fabric is tight enough that stuffing doesn’t peek through the gaps. If you can see light through your stitches, go down a hook size.
- Keep the colors you aren’t using carried loosely along the inside, or cut and rejoin for each stripe if you prefer cleaner color changes. Carrying works fine here because the stripes are close together.
- Stuff firmly but not so hard that the stitches splay open. A round bee should feel springy, not rock solid.
The Pattern
This bee is made in two parts: one body and two wings. Work the body first.
Body (make 1)
Start with yellow. Work in a continuous spiral.
- Rnd 1: 6 sc in MR. (6)
- Rnd 2: inc in each st around. (12)
- Rnd 3: (1 sc, inc) × 6. (18)
- Rnd 4: (2 sc, inc) × 6. (24)
- Rnd 5: (3 sc, inc) × 6. (30)
- Rnd 6: (4 sc, inc) × 6. (36)
- Rnd 7: (5 sc, inc) × 6. (42)
- Rnds 8–11: sc in each st around. (42) (4 rounds)
Set the eyes now. Place the two 8 mm safety eyes between Rnds 9 and 10, about 6 stitches apart, centered on the front of the bee (the magic-ring end is the front face). Don’t fix the backs on until you’re happy with the spacing.
Now begin the stripes by switching colors.
- Rnd 12: change to black. sc in each st around. (42)
- Rnd 13: black. sc in each st around. (42)
- Rnd 14: change to yellow. sc in each st around. (42)
- Rnd 15: yellow. sc in each st around. (42)
- Rnd 16: change to black. sc in each st around. (42)
- Rnd 17: black. sc in each st around. (42)
- Rnd 18: change to yellow. sc in each st around. (42)
- Rnd 19: yellow. (5 sc, dec) × 6. (36)
- Rnd 20: change to black. (4 sc, dec) × 6. (30)
- Rnd 21: black. (3 sc, dec) × 6. (24)
- Rnd 22: change to yellow. (2 sc, dec) × 6. (18)
Start stuffing the body firmly now, and keep adding stuffing as you close it up.
- Rnd 23: yellow. (1 sc, dec) × 6. (12)
- Rnd 24: yellow. dec × 6. (6)
Fasten off, leaving a tail. Thread the tail through the front loops of the last 6 stitches and pull tight to close the hole. Weave the end inside.
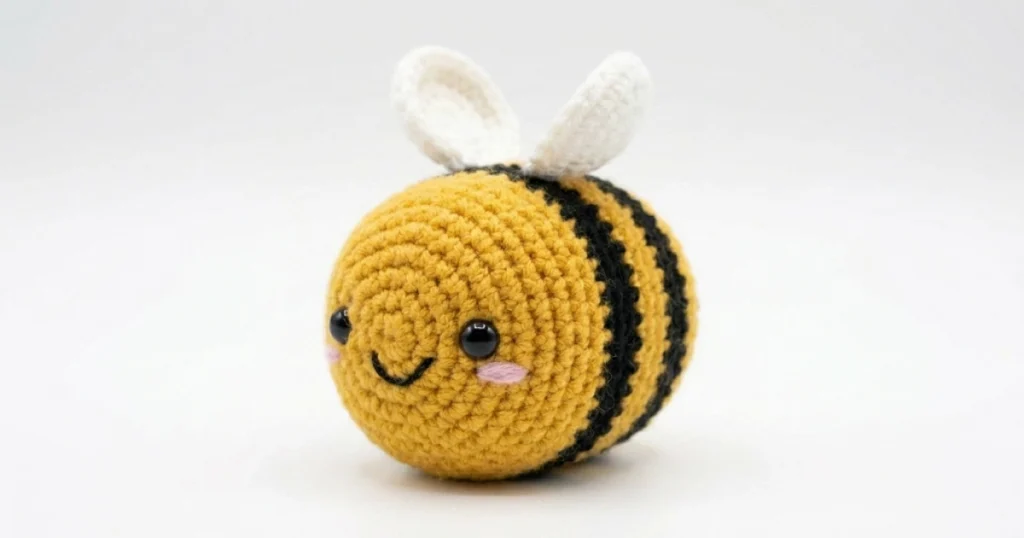
You should now have a plump oblong bee with three black stripes across the back half and a wide yellow face at the front.
Wings (make 2)
Use white. Work in a continuous spiral. Do not stuff.
- Rnd 1: 6 sc in MR. (6)
- Rnd 2: (1 sc, inc) × 3. (9)
- Rnd 3: (2 sc, inc) × 3. (12)
- Rnd 4: sc in each st around. (12)
- Rnd 5: (2 sc, dec) × 3. (9)
- Rnd 6: sc in each st around. (9)
Flatten the opening and work 4 sc across through both layers to close the wing into a rounded petal shape. Fasten off and leave a long tail for sewing. Pinch the closed base a little so the wing wants to stand up.
How to Assemble Your Bee
- Tidy the body. Make sure it’s stuffed evenly and the closing hole is neat. Weave in the end so it disappears inside.
- Finish the face. With the eyes in place, embroider a small, shallow upward smile in black just below and between the eyes. Then stitch the little swirl from the photo: a tiny black spiral to one side of the face, level with the eyes. If you’d like rosy cheeks, add a soft pink blush under the eyes.
- Place the wings. Hold both wings on top of the body, toward the back, just behind the first black stripe. Angle them outward in a soft V so they look like they’re mid-flutter. Pin them, step back, and check the look from the front before committing.
- Sew the wings on. Stitch each wing down firmly around its flattened base so it stands upright and won’t flop.
- Weave in all remaining ends and give the bee a gentle reshape with your hands.
That’s your bumblebee finished.
Tips, Substitutions, and Variations
- Make it baby-safe. Skip the safety eyes and embroider the eyes with black thread instead. A bee meant for a small child should have everything stitched on, nothing that can be pulled off.
- Change the size. Thinner yarn (sport or fingering) with a 2.0–2.5 mm hook gives you a tiny keychain-sized bee. Chunky yarn with a 4.0 mm hook makes a big squishy one.
- Adjust the stripes. Want a chunkier look? Make each black stripe three rounds instead of two. Want a softer, gentler bee? Try charcoal grey instead of true black.
- No black yarn? Brown or deep grey both read as a believable bee stripe and look lovely in muted, neutral color schemes.
- Add a hanging loop. Before closing the body, attach a small chain loop at the top so the bee can hang from a bag or a nursery mobile.
How to Care for Your Finished Bee
Spot clean with a little mild soap and lukewarm water, then press out the water in a towel and let the bee air dry fully before squishing it back into shape. Avoid the washing machine, since the stuffing can shift and clump. Keep finished toys out of long, direct sunlight so the yellow stays bright.
Terms of Use
This pattern is free for personal use. You’re welcome to sell the finished bees you make from it at small markets or in your own shop, and a credit to Latifacha at latifacha.com is always appreciated. Please don’t copy, repost, resell, or redistribute the pattern text itself, and don’t claim it as your own. Thank you for respecting the work that goes into sharing free patterns.
Frequently Asked Questions
Is this bumblebee crochet pattern really free?
Yes. The full pattern is here on the page at no cost, and you’re free to make as many bees as you like. If you prefer to keep a copy, you can paste it into a document and save it, which is the simplest way to get free crochet patterns to download and keep for later.
Is this a good amigurumi project for beginners?
It is. As long as you can make a magic ring, single crochet, increase, and decrease, you can make this bee. The body is one piece worked in a spiral, so there’s almost no sewing, which is exactly why beginner-friendly amigurumi crochet patterns free of complicated shaping are such a confidence boost.
How long does it take to crochet a bee?
Most people finish one in an evening, roughly one to two hours depending on your pace and how fast you change colors. It’s a quick, low-pressure make, which is part of why little animal designs are such a popular corner of free crochet animal patterns.
What yarn and hook should I use?
Worsted weight yarn with a 3.0 mm hook gives a bee about 10 cm long with nice tight stitches. Any smooth yarn works as long as you size your hook down a little so the stuffing doesn’t show. There’s no need to buy anything special, which keeps this firmly in the category of easy free crochet patterns.
Can I make the bee without safety eyes?
Absolutely. Embroider the eyes with black thread instead. This is the safest choice for babies and very young children, and it gives the bee a softer, hand-stitched look.
Made this bee? I’d love to see it. Questions about the pattern are always welcome at contact@latifacha.com.
Bumblebee Crochet Pattern · latifacha.com · by Latifacha