Fox Crochet Pattern
A free, beginner-friendly amigurumi fox you can make in a weekend.
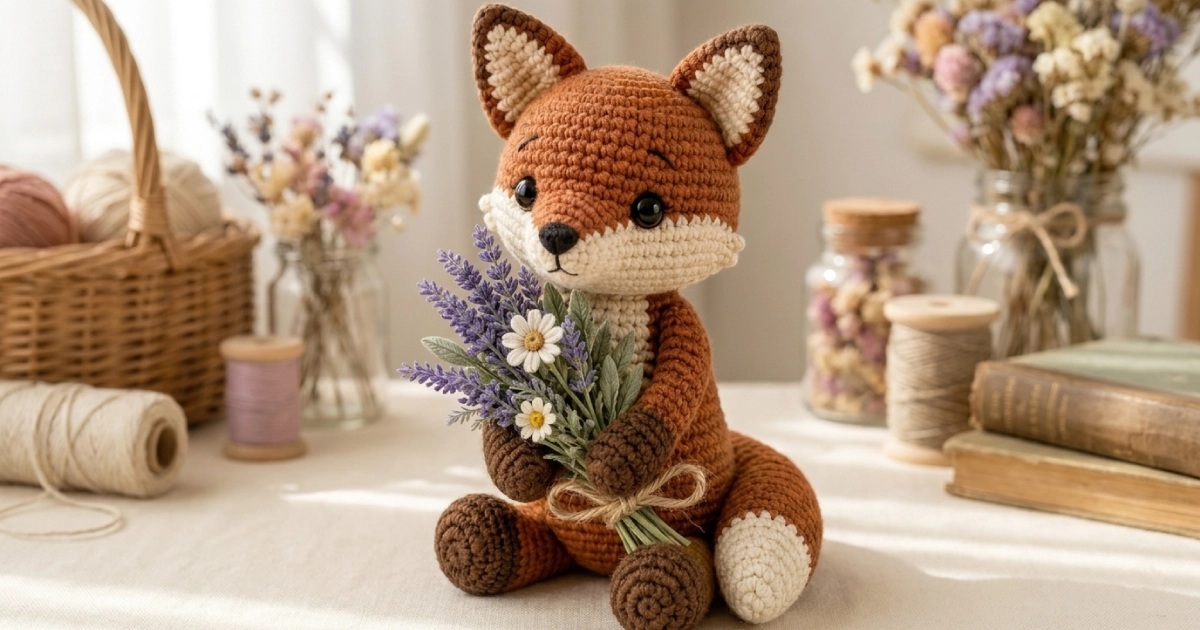
There is something about a little crocheted fox that makes people stop and smile. Maybe it is the pointed ears, or the bushy tail, or the way a well-stuffed amigurumi sits with its paws folded like it is waiting for a hug. This fox has all of that, plus a cream muzzle, soft brown paws, and a white-tipped tail that gives it that classic woodland look.
This is a free crochet pattern, so you can grab it, save it, and start stitching whenever you have a quiet hour. It works up in worsted or DK yarn, uses only basic stitches, and comes together in separate pieces that you sew at the end. If you have made an amigurumi ball before, you already know almost everything you need.
I have laid out every round with the stitch count in parentheses so you never lose your place. There is a short abbreviations table further down if any of the shorthand looks unfamiliar. Read through the materials list first, pick your colors, and you are ready to begin.
If you collect free crochet animal patterns the way some people collect yarn, this fox slots in nicely next to bunnies, cows, and llamas. And because the whole thing is written out below, it doubles as one of those free crochet patterns to download or simply copy into your project notes.
Skill Level
Easy to intermediate. You should be comfortable working in continuous rounds, increasing, decreasing, and changing colors. Nothing here is complicated, but the colorwork on the feet, ears, and tail asks for a little patience.
Finished Size
Roughly 20 to 24 cm (8 to 9.5 in) tall when seated, depending on your yarn and hook. Going down a hook size from what your yarn label suggests keeps the fabric tight so the stuffing does not show through.
Materials You Will Need
- Worsted (medium, #4) or DK yarn in four colors:
- Rust or cinnamon orange (main color, the most you will use)
- Cream or off-white (muzzle, inner ears, chest, tail tip)
- Dark cocoa brown (feet and ear tips)
- A small amount of black (nose)
- Crochet hook one size smaller than your yarn recommends (around 3.0 to 3.5 mm for worsted)
- Two safety eyes, 9 mm
- Polyester fiberfill stuffing
- Tapestry or yarn needle
- Stitch markers
- Scissors
- Optional, for the photo styling only: a small bundle of faux lavender and daisies tied with twine
Abbreviations (US Terms)
| Abbreviation | Meaning |
|---|---|
| MR | magic ring |
| ch | chain |
| sc | single crochet |
| inc | increase (2 sc in one stitch) |
| dec | invisible decrease (2 sc worked together) |
| st(s) | stitch(es) |
| sl st | slip stitch |
| FLO | front loop only |
| BLO | back loop only |
| FO | fasten off |
| ( ) | total stitch count at end of round |
| x6 | repeat the instructions the given number of times |
A quick note before you start: work in continuous spirals unless told otherwise, and move your stitch marker up at the start of each round so you can keep count.

The Pattern
Head
Start with rust orange.
- Rnd 1: 6 sc in MR (6)
- Rnd 2: inc x6 (12)
- Rnd 3: (sc, inc) x6 (18)
- Rnd 4: (2 sc, inc) x6 (24)
- Rnd 5: (3 sc, inc) x6 (30)
- Rnd 6: (4 sc, inc) x6 (36)
- Rnd 7: (5 sc, inc) x6 (42)
- Rnd 8 to 14: sc in each st around (42)
- Rnd 15: (5 sc, dec) x6 (36)
- Rnd 16: (4 sc, dec) x6 (30)
Place the safety eyes between rounds 11 and 12, about 8 stitches apart. Look at the front of the head and set them just above center so the fox keeps that sweet, slightly sleepy expression.
- Rnd 17: (3 sc, dec) x6 (24)
- Rnd 18: (2 sc, dec) x6 (18)
Start stuffing firmly here and keep adding as you close.
- Rnd 19: (sc, dec) x6 (12)
- Rnd 20: dec x6 (6)
FO, leave a short tail, and use your needle to close the small hole. Set the head aside.
Muzzle
With cream.
- Rnd 1: 6 sc in MR (6)
- Rnd 2: inc x6 (12)
- Rnd 3: (sc, inc) x6 (18)
- Rnd 4 to 5: sc around (18)
FO, leaving a long tail for sewing. Stuff very lightly so it stays slightly domed. You will sew this to the lower front of the head once the face is finished.
Ears (make 2)
Start with dark brown for the tips.
- Rnd 1: 4 sc in MR (4)
- Rnd 2: (sc, inc) x2 (6)
Change to rust orange.
- Rnd 3: (2 sc, inc) x2 (8)
- Rnd 4: (3 sc, inc) x2 (10)
- Rnd 5: (4 sc, inc) x2 (12)
Flatten the ear and sc across both layers to close (6 sts). FO and leave a long tail.
Inner Ears (make 2)
With cream, make a small flat triangle.
- Ch 4. Starting in the second ch from hook, work 1 sc, 1 sc, then 3 sc in the last ch. Continue along the other side of the chain: 1 sc, 1 sc (about 7 sts total).
FO and leave a tail. Sew one cream triangle to the front of each ear so the brown tip peeks out at the top.
Body
With rust orange.
- Rnd 1: 6 sc in MR (6)
- Rnd 2: inc x6 (12)
- Rnd 3: (sc, inc) x6 (18)
- Rnd 4: (2 sc, inc) x6 (24)
- Rnd 5: (3 sc, inc) x6 (30)
- Rnd 6: (4 sc, inc) x6 (36)
- Rnd 7 to 13: sc around (36)
- Rnd 14: (4 sc, dec) x6 (30)
- Rnd 15: sc around (30)
- Rnd 16: (3 sc, dec) x6 (24)
- Rnd 17: sc around (24)
- Rnd 18: (2 sc, dec) x6 (18)
Stuff the body firmly. FO and leave a long tail for attaching the head.
Belly Patch
With cream.
- Rnd 1: 6 sc in MR (6)
- Rnd 2: inc x6 (12)
- Rnd 3: (sc, inc) x6 (18)
- Rnd 4: (2 sc, inc) x6 (24)
FO and leave a tail. Do not stuff. Flatten it into an oval and set aside for assembly. This becomes the cream chest on the front of the body.
Arms (make 2)
With rust orange.
- Rnd 1: 6 sc in MR (6)
- Rnd 2: inc x6 (12)
- Rnd 3: sc around (12)
- Rnd 4: (2 sc, dec) x3 (9)
- Rnd 5 to 9: sc around (9)
Stuff lightly, only the lower half. Flatten the top and sc across to close (4 sts). FO and leave a tail.
Legs and Feet (make 2)
Start with dark brown for the feet.
- Rnd 1: 6 sc in MR (6)
- Rnd 2: inc x6 (12)
- Rnd 3: (sc, inc) x6 (18)
- Rnd 4: (2 sc, inc) x6 (24)
- Rnd 5 to 7: sc around (24)
- Rnd 8: (2 sc, dec) x6 (18)
Change to rust orange.
- Rnd 9: (sc, dec) x6 (12)
- Rnd 10 to 14: sc around (12)
Stuff the foot firmly and the leg lightly. FO and leave a long tail. The brown foot should sit flat so the fox can balance in a seated pose.
Tail
Start with cream for the tip.
- Rnd 1: 6 sc in MR (6)
- Rnd 2: inc x6 (12)
- Rnd 3: (sc, inc) x6 (18)
- Rnd 4 to 5: sc around (18)
Change to rust orange.
- Rnd 6: sc around (18)
- Rnd 7: (4 sc, dec) x3 (15)
- Rnd 8: sc around (15)
- Rnd 9: (3 sc, dec) x3 (12)
- Rnd 10 to 12: sc around (12)
Stuff the tail to keep it plump but bendable. FO and leave a long tail for sewing.
Nose
Using black yarn and your needle, embroider a small rounded triangle at the tip of the cream muzzle. Build it up with several passes until it looks solid. If you prefer, stitch a short line straight down from the nose for the mouth.
Assembly
Take your time here. Pinning each piece in place before you sew makes a real difference in how the finished fox sits.
- Sew the cream muzzle to the lower front of the head, centered below the eyes. Add the embroidered nose at the top point of the muzzle.
- Sew an inner-ear triangle onto the front of each ear, then attach the ears to the top of the head, angled slightly outward.
- Embroider two small eyebrow lines above the eyes if you want that gentle, content expression.
- Sew the cream belly patch flat onto the front of the body.
- Attach the head to the body, lining up the face with the belly patch. Sew all the way around the join so it holds.
- Sew the legs to the front base of the body so the brown feet point forward and the fox sits upright.
- Sew the arms to the upper sides of the body, just below the head.
- Sew the tail to the lower back of the body so it curls around to one side.
If you want to recreate the styled photo, tuck a small bundle of faux lavender and daisies between the arms and tie it with twine. This is decoration only and is not crocheted.
Tips and Substitutions
- For a softer, cuddlier fox, use a brushed or velvet yarn. Just know that velvet hides your stitches, so counting is harder.
- No safety eyes on hand? Embroider eyes with black yarn instead. This is also the safer choice for a toy going to a baby or young child.
- If your colorwork joins leave a small gap, a quick stitch or two on the inside with matching yarn tidies it right up.
- Stuff in small amounts and check the shape often. Over-stuffing stretches the fabric; under-stuffing leaves it floppy.
- Want a bigger fox? Move up to chunky yarn and a larger hook. The pattern stays the same; the finished size grows.
Care Instructions
Spot clean with a damp cloth and a little mild soap. If you used acrylic or cotton and the fox needs a full wash, hand wash in cool water and press out the moisture in a towel rather than wringing. Lay flat to dry, away from direct heat, and reshape while damp so the ears and tail keep their form.
Copyright and Terms of Use
This pattern is free for personal use. You are welcome to make and sell finished items from it, and a credit back to the original pattern is always appreciated. Please do not copy, republish, redistribute, or resell the pattern text or photos as your own. Thank you for respecting the work that goes into writing free patterns.
Frequently Asked Questions
What yarn weight works best for this fox crochet pattern?
Worsted (#4) or DK yarn both work well. Worsted gives you a slightly larger fox and works up faster, while DK produces a finer, more detailed finish. Whatever you choose, pair it with a hook one size smaller than the label suggests so the fabric stays dense.
Is this really a free crochet pattern?
Yes. The full pattern is written out above for free, with every round and stitch count included. You can read it here, save it, or copy it into your own notes. It is one of many free crochet animal patterns you can make at home without buying anything extra.
How long does it take to crochet a fox amigurumi?
Most makers finish in four to six hours of stitching, often spread across a weekend. The seated pieces are small and quick, and the assembly is the part that rewards going slow.
Can beginners make this amigurumi crochet pattern?
If you can crochet in the round, increase, decrease, and change colors, you can make this fox. The hardest part is the colorwork on the feet, ears, and tail, and even that is just switching yarn at the marked rounds. It is a friendly project for anyone moving past their first few amigurumi balls.
Where can I find more free crochet patterns to download?
You will find more characters and seasonal makes on latifacha.com, all written in the same clear, round-by-round style. New free crochet patterns are added regularly, so there is always something fresh to stitch.