Hedgehog Amigurumi Pattern – Free Step-by-Step Crochet Pattern (Hazel the Hedgehog)
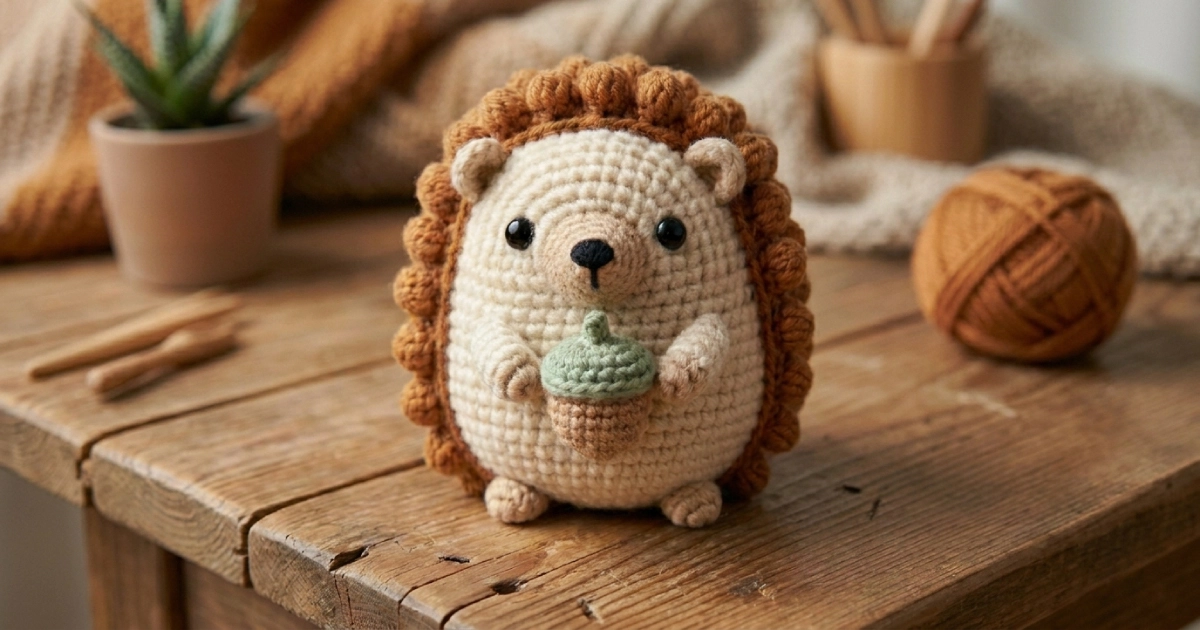
There’s something about a little crochet hedgehog that makes people stop and smile. Maybe it’s the round belly, or the way the bobble-stitch spines bunch up like a tiny pinecone. This hedgehog amigurumi pattern walks you through making one from your first stitch to the last, including the small acorn she likes to hold against her tummy.
It’s a free, beginner-friendly project written in plain US crochet terms, with a stitch count on every single round so you never lose your place. The only stitch that might be new to you is the bobble, and that’s the one that gives the spines their plump, bumpy look. After the first handful, they work up fast.
I named this one Hazel because of the acorn. She finishes at about 11 cm (4.3 inches) and sits on her own, which makes her a nice shelf friend or a soft gift. If you’ve been collecting free crochet animal patterns and looking for one with a bit of texture to it, this is a good place to start.
Why You’ll Like Making This Hedgehog
- The spines do the heavy lifting. Bobble stitches give the back instant texture, so a fairly simple shape ends up looking detailed.
- It’s a small, finishable project. The whole hedgehog comes together over a couple of cozy evenings rather than weeks.
- The acorn is optional and quick. Make it, swap it for a tiny mushroom, or leave her empty-handed.
- Stitch counts on every round. This is one of those amigurumi crochet patterns free of guesswork, which matters a lot when you’re shaping a sphere.
Materials and Tools
Yarn (worsted / aran weight, #4)
A smooth cotton or acrylic shows the bobble texture better than a fuzzy yarn, so I’d reach for cotton here.
| Color | Used for | Approx. amount |
|---|---|---|
| Cream / oatmeal | Body, face, belly, muzzle, ears, paws, feet | 40 g |
| Cinnamon / caramel brown | Spiny hood (bobbles) | 25 g |
| Warm tan / light brown | Acorn nut | small amount |
| Sage green | Acorn cap and stem | small amount |
| Black | Nose (embroidery) | scrap |
Hook
- 3.0 mm crochet hook (a half size smaller than the yarn band suggests, so the fabric stays tight and the stuffing doesn’t peek through).
Notions
- Two 8 mm black safety eyes
- Polyester fiberfill stuffing
- Tapestry / yarn needle
- Stitch marker
- Scissors
Abbreviations
| Abbreviation | Meaning |
|---|---|
| ch | chain |
| sc | single crochet |
| inc | increase (2 sc in the same stitch) |
| dec | decrease (single crochet 2 together) |
| BO | bobble (see Notes) |
| BLO | back loop only |
| st(s) | stitch(es) |
| rnd(s) | round(s) |
All instructions use US crochet terminology.
Notes Before You Start
- Work in a continuous spiral. Don’t join or chain up between rounds. Drop a stitch marker into the first stitch of each round and move it up as you go.
- How to make the bobble (BO): In the same stitch, work 4 half-finished double crochets, then close them together in one go. Step by step: yarn over, insert hook into the stitch, yarn over and pull up a loop, yarn over and draw through the first 2 loops on the hook. You now have 2 loops left on the hook. Repeat that whole sequence 3 more times in the same stitch (you’ll have 5 loops on the hook). Then yarn over and pull through all 5 loops. Push the bobble out toward the front (the right side) with your thumb. The plain stitch right after each bobble locks it in place.
- Stuffing. Stuff the body firmly so it holds a round shape, but stop before it stretches and shows gaps between stitches. The hood, ears, feet and paws stay mostly unstuffed.
- Starting rounds. Each piece starts with
2 ch, then 6 sc in the 2nd ch from the hook.If you prefer a magic ring, use that instead. Either gives you the same first round of 6.
Finished size: about 11 cm / 4.3 in long · Skill level: Easy–Intermediate · Time: a few evenings

The Pattern
Body (cream)
- Rnd 1: 2 ch, 6 sc in 2nd ch from hook. (6)
- Rnd 2: 6 inc. (12)
- Rnd 3: (1 sc, 1 inc) ×6. (18)
- Rnd 4: (2 sc, 1 inc) ×6. (24)
- Rnd 5: (3 sc, 1 inc) ×6. (30)
- Rnd 6: (4 sc, 1 inc) ×6. (36)
- Rnd 7: (5 sc, 1 inc) ×6. (42)
- Rnds 8–16: 42 sc (9 rounds). (42)
Around Rnd 12, place the two 8 mm safety eyes on the front, about 6 stitches apart and roughly 4 rounds up from where the belly curves in. Don’t lock the washers on until you’re happy with the spacing.
- Rnd 17: (5 sc, 1 dec) ×6. (36)
- Rnd 18: (4 sc, 1 dec) ×6. (30)
- Rnd 19: (3 sc, 1 dec) ×6. (24) — begin stuffing firmly
- Rnd 20: (2 sc, 1 dec) ×6. (18)
- Rnd 21: (1 sc, 1 dec) ×6. (12)
- Rnd 22: 6 dec. (6)
Finish stuffing, fasten off, leave a short tail. Thread it through the front loops of the last 6 stitches and pull tight to close.
Spiny Hood (caramel)
This is an open bowl of bobbles that sits over the back and top of the body, framing the face. Don’t stuff it.
- Rnd 1: 2 ch, 6 sc in 2nd ch from hook. (6)
- Rnd 2: 6 inc. (12)
- Rnd 3: (1 sc, 1 inc) ×6. (18)
- Rnd 4: (1 BO, 1 sc) ×9. (18) — 9 bobbles
- Rnd 5: (2 sc, 1 inc) ×6. (24)
- Rnd 6: (1 BO, 1 sc) ×12. (24) — 12 bobbles
- Rnd 7: (3 sc, 1 inc) ×6. (30)
- Rnd 8: (1 BO, 1 sc) ×15. (30)
- Rnd 9: (4 sc, 1 inc) ×6. (36)
- Rnd 10: (1 BO, 1 sc) ×18. (36)
- Rnd 11: (5 sc, 1 inc) ×6. (42)
- Rnd 12: (1 BO, 1 sc) ×21. (42)
- Rnd 13: 42 sc. (42)
- Rnd 14: (1 BO, 1 sc) ×21. (42)
Fasten off, leaving a long tail (about 60 cm) for sewing. Because the increases shift the count slightly between bobble rounds, the bobbles stagger on their own and cover the surface evenly.
Muzzle (cream)
A small raised snout for the pointed face. The black nose goes on the tip later.
- Rnd 1: 2 ch, 6 sc in 2nd ch from hook. (6)
- Rnd 2: (2 sc, 1 inc) ×2. (8)
- Rnd 3: 8 sc. (8)
Fasten off, leave a tail. Stuff very lightly.
Ears (make 2, cream)
- Rnd 1: 2 ch, 5 sc in 2nd ch from hook. (5)
- Rnd 2: 5 sc. (5)
Fasten off, leave a tail. Do not stuff. Pinch the opening flat before sewing.
Paws (make 2, cream)
- Rnd 1: 2 ch, 5 sc in 2nd ch from hook. (5)
- Rnds 2–4: 5 sc (3 rounds). (5)
Fasten off, leave a tail. Leave unstuffed (or stuff very lightly) so the paws can curve around the acorn.
Feet (make 2, cream)
- Rnd 1: 2 ch, 6 sc in 2nd ch from hook. (6)
- Rnd 2: 6 sc. (6)
Fasten off, leave a tail. Do not stuff. Flatten slightly when sewing on.
Acorn — Nut (tan)
- Rnd 1: 2 ch, 6 sc in 2nd ch from hook. (6)
- Rnd 2: (1 sc, 1 inc) ×3. (9)
- Rnd 3: (2 sc, 1 inc) ×3. (12)
- Rnds 4–5: 12 sc (2 rounds). (12)
- Rnd 6: (2 sc, 1 dec) ×3. (9) — stuff lightly
- Rnd 7: (1 sc, 1 dec) ×3. (6)
Fasten off and cinch the last 6 stitches closed.
Acorn — Cap (sage green)
- Rnd 1: 2 ch, 6 sc in 2nd ch from hook. (6)
- Rnd 2: 6 inc. (12)
- Rnd 3: (1 sc, 1 inc) ×6. (18)
- Rnd 4: 18 sc in BLO (this makes the little rim of the cap). (18)
- Rnd 5: 18 sc. (18)
Fasten off, leave a tail. For the stem, join the green yarn at the center top of the cap, 3 ch, then 1 sc in the 2nd ch from the hook and 1 sc in the next ch, and fasten off into the cap. Set the cap over the nut and you have a finished acorn.
Putting It All Together (Assembly)
Work in this order so each piece sits against finished pieces.
- Nose. With black yarn, embroider a small filled triangle (a few satin stitches) at the tip of the muzzle. Add one short straight stitch down from the point if you’d like a little mouth line.
- Muzzle. Sew the muzzle low and center on the front of the face, just below and between the eyes. Add a pinch more stuffing before closing the last bit of the seam so it stays raised.
- Spiny hood. Set the open bobble bowl over the back and top of the body, angled so it frames the face and leaves the cream face and belly showing. Pin it, check from the front, then whip-stitch the rim to the body all the way around.
- Ears. Tuck the two ears right at the front edge of the hood, near the top of the face where the spines meet the cream. Sew them on flat.
- Feet. Sew the two feet to the front underside so the hedgehog tips forward slightly and sits upright.
- Acorn and paws. Hold the acorn against the lower belly. Sew the two paws on either side of it so they look like they’re cupping it, catching the back of each paw to the acorn as you go so it stays put.
- Final check. Even out any stuffing, hide all yarn tails inside the body, and give the spines a gentle push outward so they stand up.
Tips for a Cleaner Finish
- Bobble side. Keep all your bobbles popping out on the same side as you work. A quick thumb-push after closing each one trains them to face front.
- Eye placement is everything. The whole expression lives in where the eyes sit. Pin them in with the muzzle held in place and look at the face from arm’s length before you commit.
- Hide the seam. Sew the hood on with the caramel tail and aim your stitches into the dips between bobbles. The texture swallows the seam.
- A tidy face. Work the front body rounds a touch tighter than the back. A firmer face holds the eyes and muzzle without puckering.
Yarn Substitutions and Color Ideas
- Color swaps. A gray body with charcoal spines reads as a wild European hedgehog. A pale pink body with cream spines leans cute and kawaii. The acorn can be any small accent color you like.
- Velvet yarn. You can use a chenille / velvet yarn for a softer, cuddlier hedgehog, but be aware the bobbles will look rounder and less defined. Go down a hook size to keep the fabric tight.
- Seasonal accessories. Swap the acorn for a tiny crochet mushroom, a strawberry, or a small leaf for a different look from the same base.
- No safety eyes? Embroider the eyes with black yarn instead, which is the safer choice if this is going to a baby or very young child.
How to Care for Your Hedgehog
- Surface clean first. Spot-clean with a little mild soap on a damp cloth and let it air dry. This is gentlest on the stuffing and the safety eyes.
- Hand wash if needed. Use cool water and a gentle soap, press out the water (don’t wring), reshape by hand, and air dry away from direct heat.
- Skip the dryer. Machine heat can felt or flatten the spines and warp the shape.
Copyright and Terms of Use
This pattern is written by Latifacha for latifacha.com and is free for personal use. You’re welcome to sell the finished hedgehogs you make from it, ideally with a small credit to latifacha.com as the pattern source. Please don’t copy, reprint, redistribute, or resell the pattern text or photos as your own, and don’t repost it as a file elsewhere. Questions about usage can go to contact@latifacha.com.
Frequently Asked Questions
Is this hedgehog amigurumi pattern good for beginners?
Mostly, yes. The shaping is standard amigurumi (increase up, single crochet straight, decrease down), so if you can make a basic ball you can make the body. The one new skill is the bobble stitch, and the Notes section breaks it down step by step. Make two or three practice bobbles on a swatch first and you’ll be set.
What is a bobble stitch and why does this pattern use it?
A bobble is several tall stitches worked into one stitch and then closed together, which makes a raised, rounded bump on the surface of your work. This pattern uses bobbles across the back to create the hedgehog’s spines without sewing on dozens of separate pieces. It’s the single technique that gives the whole project its texture.
What size hook and yarn should I use?
Worsted (aran, #4) weight yarn with a 3.0 mm hook gives the size shown here, around 11 cm long. A smooth cotton or acrylic shows the bobbles best. You can use any yarn weight you like as long as you match the hook to it; a chunkier yarn simply makes a bigger hedgehog.
Can I make this hedgehog safe for a baby?
Yes. Skip the plastic safety eyes and embroider the eyes with black yarn instead, since small parts can come loose over time. Stuff firmly, sew every piece on securely, and double-check there are no loose ends a child could pull.
Can I sell what I make from this free pattern?
You can sell the finished hedgehogs you crochet from it. A credit to latifacha.com as the pattern source is appreciated. What you can’t do is sell or redistribute the pattern itself, the written instructions, or the photos.
Looking for more free crochet patterns to download and stitch this weekend? Hazel is part of a growing set of free crochet animal patterns on latifacha.com, each written round by round in US terms with the same clear stitch counts.