Free Crochet Parakeet Pattern: Make a Realistic Budgie Amigurumi
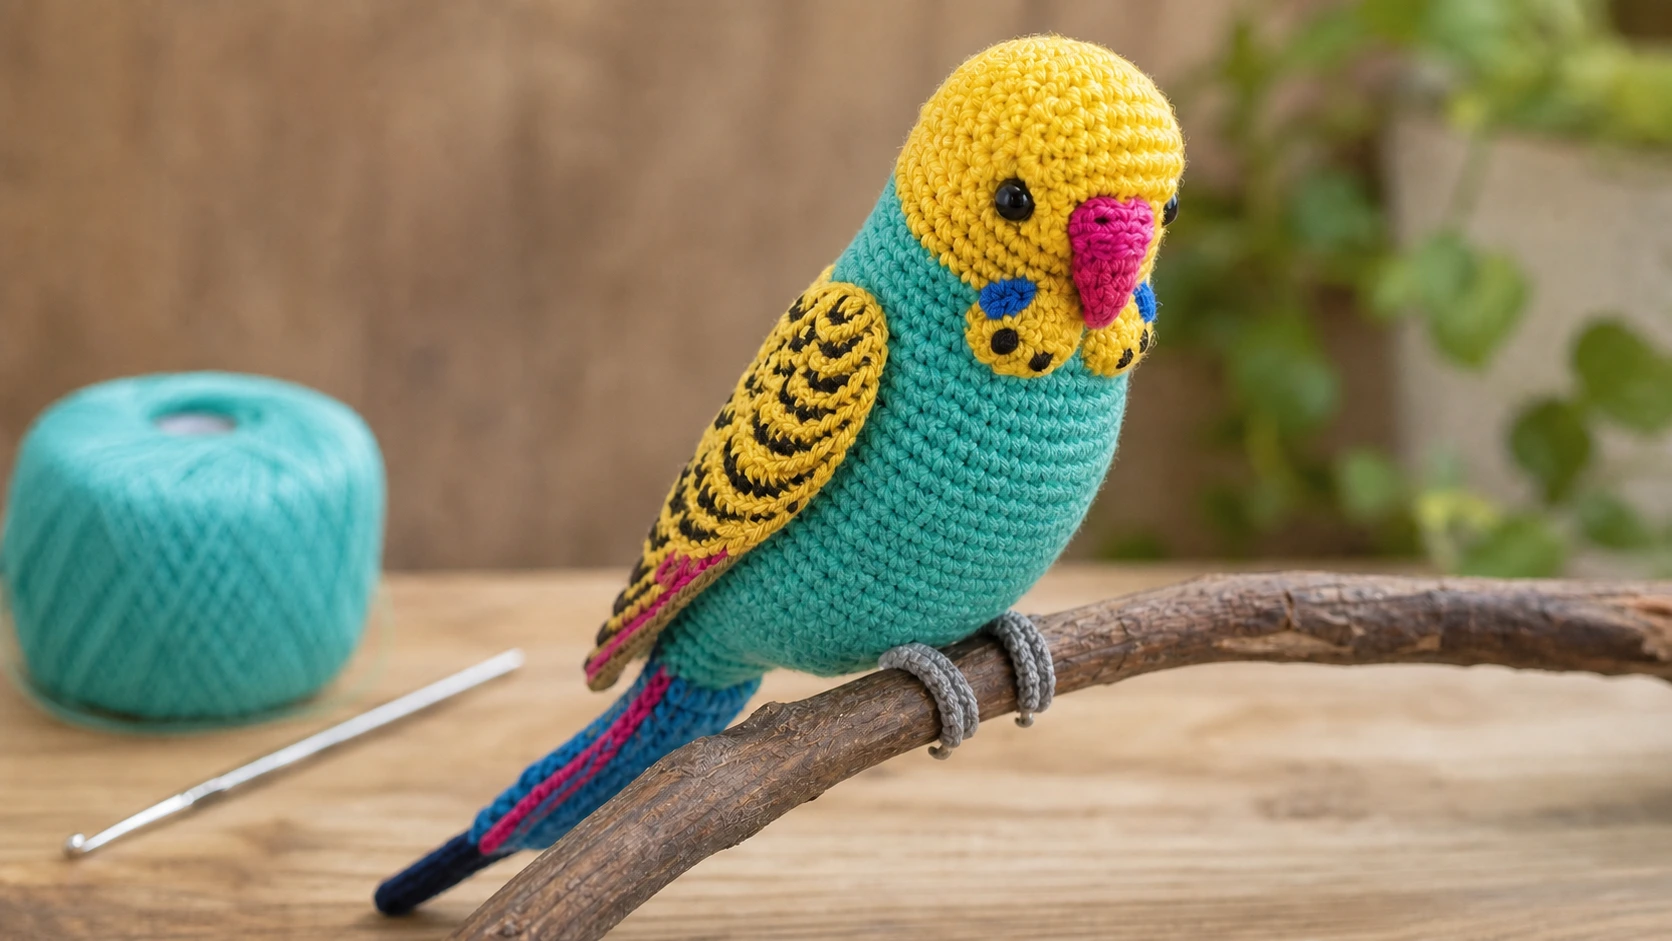
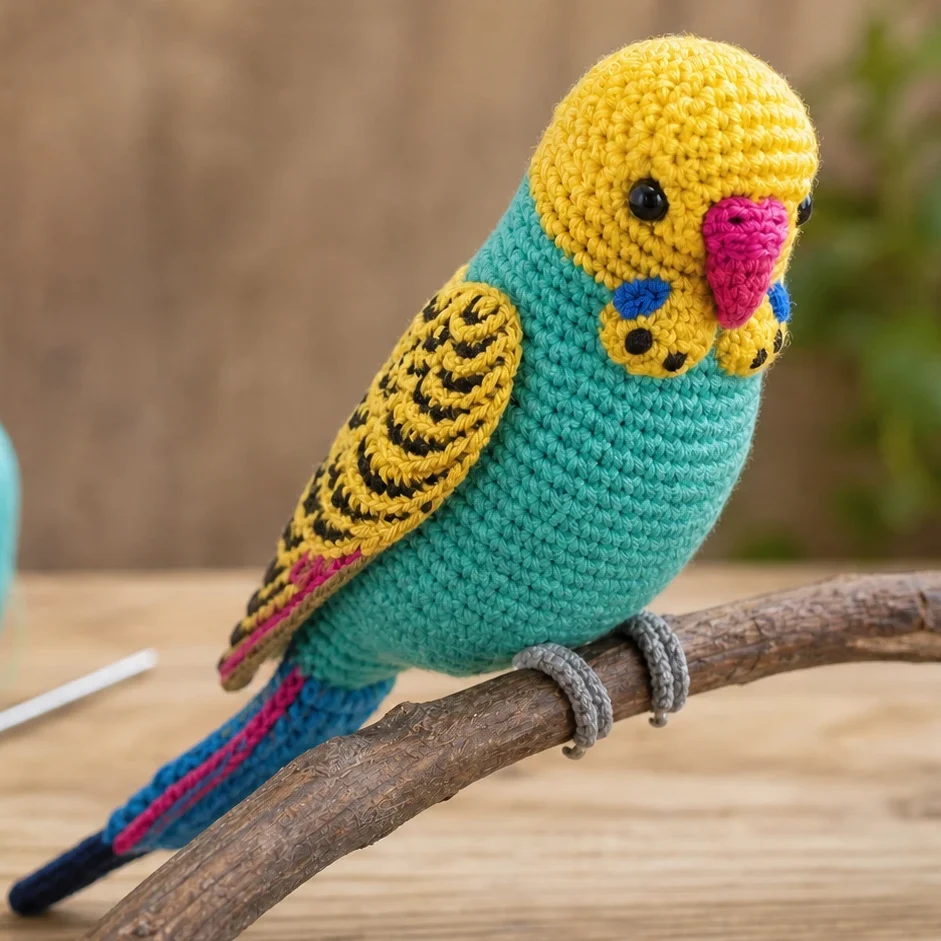
Most amigurumi birds are soft and round, but this one is different. This free crochet parakeet pattern makes a realistic budgerigar, roughly 9.5 by 13.5 cm, worked in fine yarn over a wire frame so it can perch on poseable legs and hold the natural curve of its wings and tail. Designed by Svetlana Kononenko, it is a satisfying challenge for makers who want a lifelike result rather than a plush toy.
This is an advanced project, best for experienced crocheters who are happy working with fine yarn, wire, and detailed shaping. Everything you need is written out below, row by row, with full assembly notes. Read the whole pattern through once first, then get your supplies together.
A Quick Look at the Project
You build this budgie on a wire armature. The legs and toes are shaped over wire and crocheted right into the body, and the wings and tail feathers are worked around thin wire so they keep their shape without any starching. The head and body are one piece, and the forehead, cheeks, cere, and beak are added for the final detail. You can make a blue budgie with a white face or a green one with a yellow face.
Here is what you are signing up for:
- Difficulty: Advanced
- Finished size: About 9.5 x 13.5 cm (3.7 x 5.3 in)
- How long it takes: Several sessions, this is a patient make
- Method: Wire-framed legs and feathers, one-piece head and body, details sewn on
What to Gather Before You Start
- Fine acrylic yarn (the sample uses YarnArt Etamin, 180 m in 30 g):
- Blue budgie: light blue, blue, beige, white, grey
- Green budgie: yellow, green, blue, beige
- About 6 g of the main color, 3 g of the secondary, and a gram or so of each of the rest
- Fine navy or olive bobbin thread, worked with the yarn on the head and body
- A 1.25 mm steel hook (US #8), smaller than the yarn suggests, to keep the fabric tight
- Fiberfill stuffing and a blunt skewer or toothpick for stuffing
- Tapestry needle and scissors
- Round pliers and wire cutters
- Frame wire: about 0.5 mm steel or 1 mm copper for the feet, and 0.5 mm wire for the feathers
- Textile band-aid (medical tape)
- Two 5 mm black half-round beads for the eyes
- Moment Crystal glue and PVA glue
- Six 2 mm sequins or beads for the cheek spots (or embroider them)
- Thread for tightening the tail
Crochet Terms Used
This pattern is written in US terminology.
- MC — magic circle
- ch — chain
- sl st — slip stitch
- sc — single crochet
- hdc — half double crochet
- dc — double crochet
- htr — half treble crochet
- tr — treble crochet
- inc — increase, 2 sc in one stitch
- dec — front-loop decrease
- thru.dec — through decrease
- (…) x n — repeat the bracket n times
- = n — the stitch count for the row
- FLO / BLO — front loop only / back loop only
- LO — loop offset, worked to stop a spiral from curving by moving the marker 1 or 2 sc without counting them
Work in a spiral with tight stitches, and stuff firmly so the wire frame is never felt. The starting marker sits at the center front of the bird.
Step-by-Step Crochet Parakeet Instructions
Legs (Make 2)
Make the legs first, since they get worked into the body. Each is shaped over wire.
- Cut 4 pieces of wire 8 cm (3 in) long.
- Wind yarn 16 mm (0.6 in) along one tip in a single layer, dampen with PVA glue, clip, and dry to form a toe.
- Without cutting the thread from the fourth toe, bring the toes together and keep wrapping to form a 3 cm (1.2 in) leg, sealing again with PVA glue.
- Wrap textile band-aid a couple of turns 2 cm (0.8 in) up from the toes as a stopper.
- Repeat for the second leg.
Now crochet the cap that covers the leg top, in a spiral:
- Row 1: 6 sc in MC, close the ring without tightening, tuck the tail inward, do not cut
- Rows 2–3: 6 sc
- Row 4: (inc, 2 sc) x 2 = 8, then close invisibly without skipping a loop = 9
Slip the wire foot into the crocheted circle without tightening, set aside, and make the second leg.
Head and Body
Work with white yarn and navy bobbin thread for the blue budgie, or yellow yarn and olive bobbin thread for the green one.
- Row 1: ch 5, 3 sc, inc, 3 sc along the other side of the chain = 8
- Row 2: (inc, 2 sc, inc) x 2 = 12
- Row 3: (sc, inc) x 6 = 18
- Row 4: (2 sc, inc) x 6 = 24
- Row 5: (3 sc, inc) x 6 = 30
Check that the marker thread runs down the center front. Fold along the starting chain to confirm, and add a loop offset if needed.
- Rows 6–8: 30 sc
- Row 9: (inc, 14 sc) x 2 = 32 + LO
- Row 10: 32 sc
Change to green or blue yarn.
- Row 11: inc, 31 sc = 33
- Row 12: inc, 32 sc = 34
- Row 13: (inc, 16 sc) x 2 = 36 + LO
- Row 14: (inc, 17 sc) x 2 = 38
- Row 15: inc, 18 sc, inc, 17 sc, inc = 41
- Row 16: (inc, 19 sc) x 2, inc = 44
- Row 17: 44 sc
- Row 18: inc, 42 sc, inc = 46 + LO
- Rows 19–21: 46 sc
- Row 22: inc, 44 sc, inc = 48
- Rows 23–27: 48 sc + LO
- Row 28: dec, 46 sc = 47
- Row 29: dec, 45 sc = 46
- Row 30: dec, 44 sc = 45
- Row 31: dec, 41 sc, dec = 43
- Row 32: 3 sc, dec, 33 sc, dec, 3 sc = 41
- Row 33: 7 sc, dec, 23 sc, dec, 7 sc = 39
Partially stuff the body now.
- Row 34: dec, sc, 5 join sc with the thigh, 2 sc, dec, 15 sc, dec, 2 sc, 5 join sc with the thigh, sc, dec = 32. The count differs from the arithmetic because you crochet 5 loops per thigh but leave 4 each.
Measure the leg length against the body, set the band-aid stopper at that height, and pull the leg thread to close the cap fully. Twist the frame wires together, wrap the ends, insert the frame into the body, and pack fiberfill around it so the wire disappears. Press the legs to the chest to keep them out of the way.
- Row 35: dec, 4 sc on the leg, 20 sc on the body, 4 sc on the leg, dec = 30
- Row 36: 7 sc, dec, 12 sc, dec, 7 sc = 28
- Row 37: 2 sc, dec, 20 sc, dec, 2 sc = 26
- Row 38: 5 sc, dec, 12 sc, dec, 5 sc = 24
- Row 39: 3 sc, dec, 14 sc, dec, 3 sc = 22
- Row 40: sc, dec, 16 sc, dec, sc = 20
- Row 41: sc, dec, sc, dec, 8 sc, dec, sc, dec, sc = 16
Fill the body with fiberfill.
- Row 42: thru.dec, dec, 8 sc, dec, thru.dec = 12
- Row 43: thru.dec, dec, 4 sc, dec, thru.dec = 8, fasten off leaving a long thread for the tail
Finish stuffing, bend the legs into a natural pose, curve the toes (two forward, two back), and trim and file the wire tips.
Wings (Make 2)
Work with yellow or white yarn plus olive or navy bobbin thread.
- Row 1: ch 6, inc, 3 sc, 3 sc in 1, 4 sc, sl st, ch, turn = 12
- Row 2: inc, 5 sc, inc, ch, turn = 9
- Row 3: inc, 7 sc, inc, ch, turn = 11
- Row 4: inc, 4 sc, 2 hdc, inc hdc, 2 dc, inc dc, turn = 14
- Row 5: inc dc, 2 dc, inc hdc, 2 hdc, 7 sc, 3 sc in 1, 11 sc, 2 sc, 2 sc, continue in the same direction
- Row 6: inc dc, 2 dc, inc hdc, 7 hdc, inc hdc, 3 hdc, sc, sl st, fasten off
Leave a tail and make the second wing to match.
Feathers (for the Wings)
Crochet the wing feathers around thin wire (about 0.5 mm copper) so they hold their shape. Wind yarn along the wire in a single tight layer, starting a centimeter from the edge and bending the tip to fix it. Plan on roughly 18 cm of wound wire for the wings and 32 cm for the tail. Attach the green or blue yarn to the sharp corner of the wing along its long edge and treat the wing as your crochet base.
- Feather 1: ch 3, add the wrapped wire, sc in the bend of the wire, 3 sc, sc into the same loop where the chain began, 2 sc on the base, turn
- Feather 2: skip 2, 3 sc, ch 3, sc in the bend of the wire, 6 sc, sc into the same loop where the feather began, sc on the base, turn
- Feather 3: skip 1, 7 sc, ch 3, sc in the bend of the wire, 10 sc, sc into the same loop where the feather began, 5 sc on the base, turn
- Feather 4: skip 1, 15 sc, ch 6, sc in the bend of the wire, 21 sc, sc into the same loop where the feather began, 3 sc on the base, sl st, then close invisibly without skipping a loop
Repeat on the second wing the same way without mirroring. The base edges get sewn to the body.
Tail
Lay a wound frame wire into the tail too.
- Feather 1: ch 25, 23 sc, 3 sc in 1, 23 sc
- Feather 2: 2 sc in the band of the wire, then FLO: 15 sc, sc in the wire, turn, 15 sc, then for both edges of the loop: inc
- Feather 3: inc, then FLO: 15 sc, sc in the wire, turn, 15 sc, sc, sl st. Fasten off and hide the end inside the stitches
Bend the base of the tail into a corner, insert it into the remaining hole at the back, and sew it on with the long body thread.
Forehead and Cheeks
Work in a single strand of yellow or white yarn.
- Row 1: ch 6, 5 sc, ch, turn = 5
- Row 2: inc, 3 sc, inc, ch, turn = 7
- Row 3: inc, 5 sc, inc, ch, turn = 9
- Rows 4–5: 9 sc, ch, turn
- Row 6: dec, 5 sc, dec, ch, turn = 7
- Row 7: dec, 3 sc, dec, ch, turn = 5 (forehead done)
- Row 8: dec, sc, dec = 3, then sc around with increases so the muzzle stays smooth, sl st, ch
- Row 9: 3 sc, ch, turn = 3
- Row 10: inc, sc, inc, ch, turn = 5
- Row 11: (dc, 5 htr, dc) in 1, 3 sc, (dc, 5 htr, dc), sl st, fasten off leaving a long tail (cheeks done)
Cere
Single strand of blue (male) or brown (female).
- ch 3, 4 sc in 1, 4 sc in 1, sl st, cut leaving a tail for sewing
Beak
Crochet in a spiral around the chain in beige.
- Row 1: ch 4, 2 sc, inc, 2 sc = 6
- Row 2: dec, 4 sc = 5
- Row 3: dec, 3 sc = 4, fill with leftover yarn, pull the hole closed by the front loops, leave a long tail
Assembling Your Budgie
This is where the parakeet comes to life, so work slowly and use invisible stitches where you can.
- Forehead and cheeks: Sew the forehead down along both loop edges, with the cheeks covering the color-change step and the forehead edge centered on the head’s starting chain.
- Beak: Sew it on with invisible stitches.
- Cere: Sew it along both loop edges, folding the top so the starting-chain holes become the nostrils.
- Eyes: Glue the black beads under the forehead, remembering that a bird’s eyes sit on the sides of the head.
- Cheek spots: Embroider black spots or use beads or sequins, and add the blue stroke as shown.
- Wings and tail: Sew the wings to the sides and secure the tail at the back.
- Toes: Curve the toes, bend the claw tips to about 90 degrees, and file them smooth.
Handy Tips for a Neater Budgie
- Crochet tightly. The small hook is intentional and keeps holes from forming. Drop a hook size if gaps show.
- Stuff generously. The frame should never be felt through the fiberfill.
- Respect the loop offset. Skipping it lets the piece curve, so move the marker exactly as directed.
- Wind the feather wire firmly. Pull the wire tighter than the yarn or the winding will sag.
- Read it through first. This is a detailed, multi-part make, so a full read before you begin saves time.
Frequently Asked Questions
Can a beginner make this crochet parakeet?
No, this is an advanced pattern. It uses fine yarn on a tiny hook, a wire armature, feathers crocheted onto wire, and detailed shaping. It is a great challenge once you have a few amigurumi behind you and are comfortable with wire.
Why does the budgie need a wire frame?
The wire gives the bird poseable legs and lets the wings and tail hold a natural curve without starching. It is the reason the finished parakeet looks lifelike instead of soft and round.
Can I make it without wire?
You can crochet the pieces without wire, but the bird will not stand on its own and the wings and tail will not hold their shape. Without wire, treat it as a soft decorative bird.
What is the cere and how do I choose its color?
The cere is the fleshy patch above a budgie’s beak. Male budgies have a blue cere and females have a beige to light brown one, so pick the color for the bird you want.
Which yarn and hook are best?
The original uses fine acrylic (YarnArt Etamin) with a 1.25 mm steel hook. The small hook keeps the fabric tight and smooth for a realistic finish. Heavier yarn produces a much bigger, less detailed bird.
Wrapping Up
This crochet budgie is a true showpiece, and completing one is an achievement worth being proud of. The wire framing asks for patience, but it is exactly what gives the little parakeet its posture and character. Stitch one in blue and one in green for a matched pair. However many you make, enjoy every stitch.