Easy Crochet Projects: A Cute Potted Flower to Make
Some makes drag on for weeks. This is not one of them. If you want easy crochet projects that come together in a sitting or two and still look adorable on a shelf, a tiny potted flower is hard to beat. It is built from simple, repeatable pieces: a round face, a few soft petals, a pair of leaves, and a little pot to hold it all.
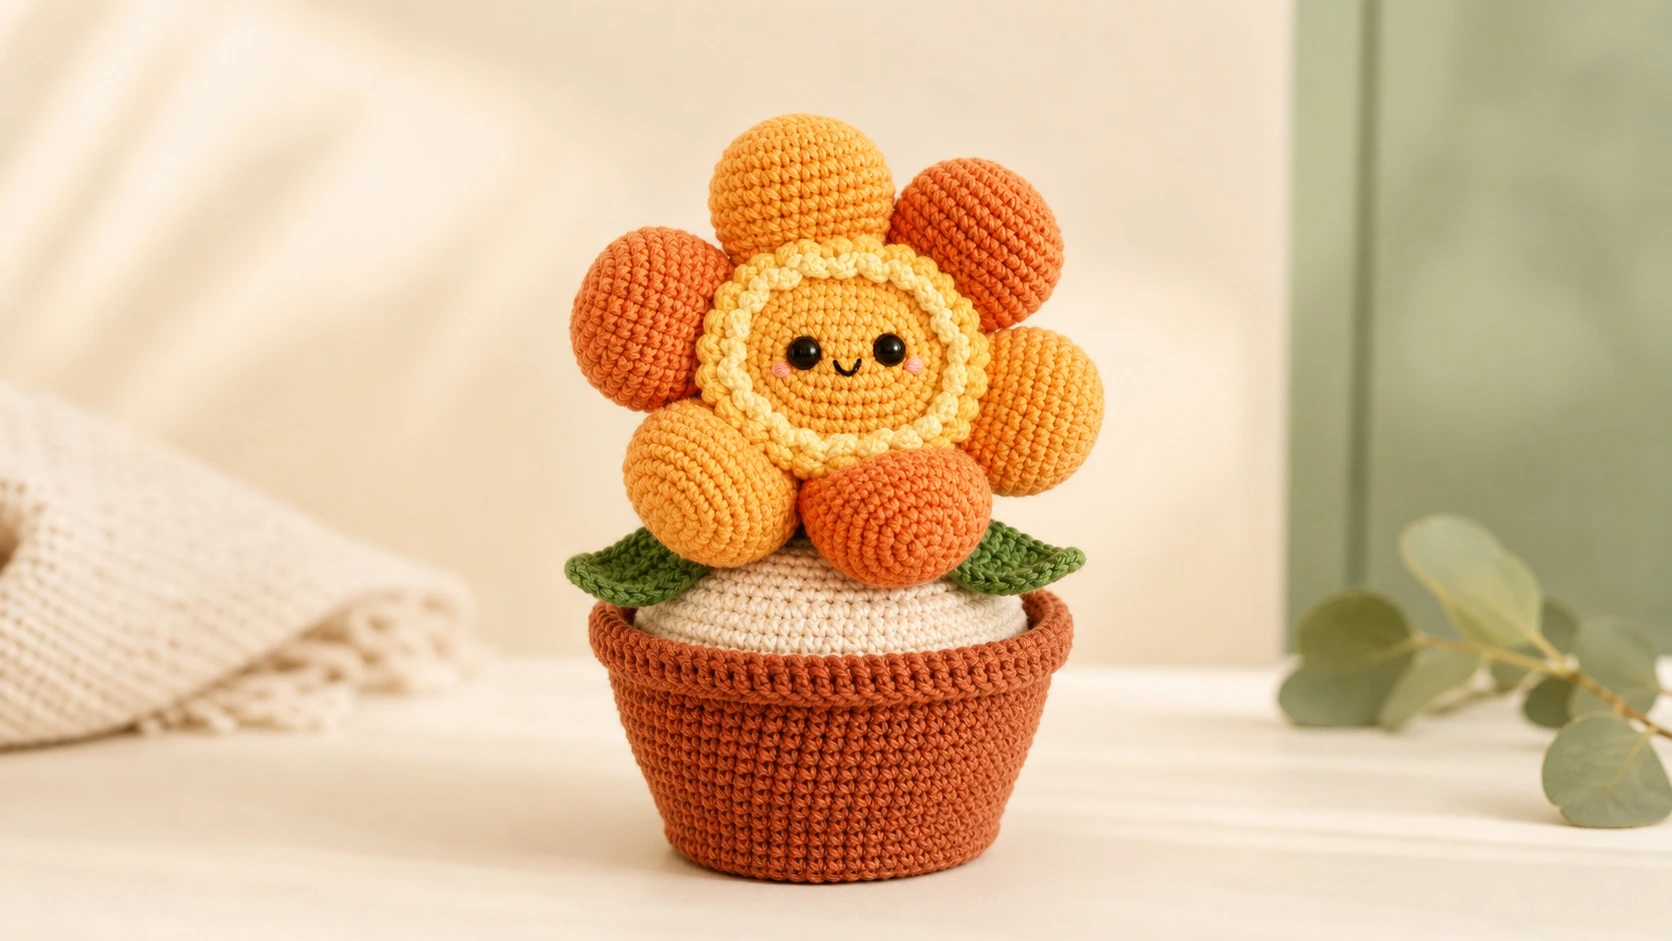
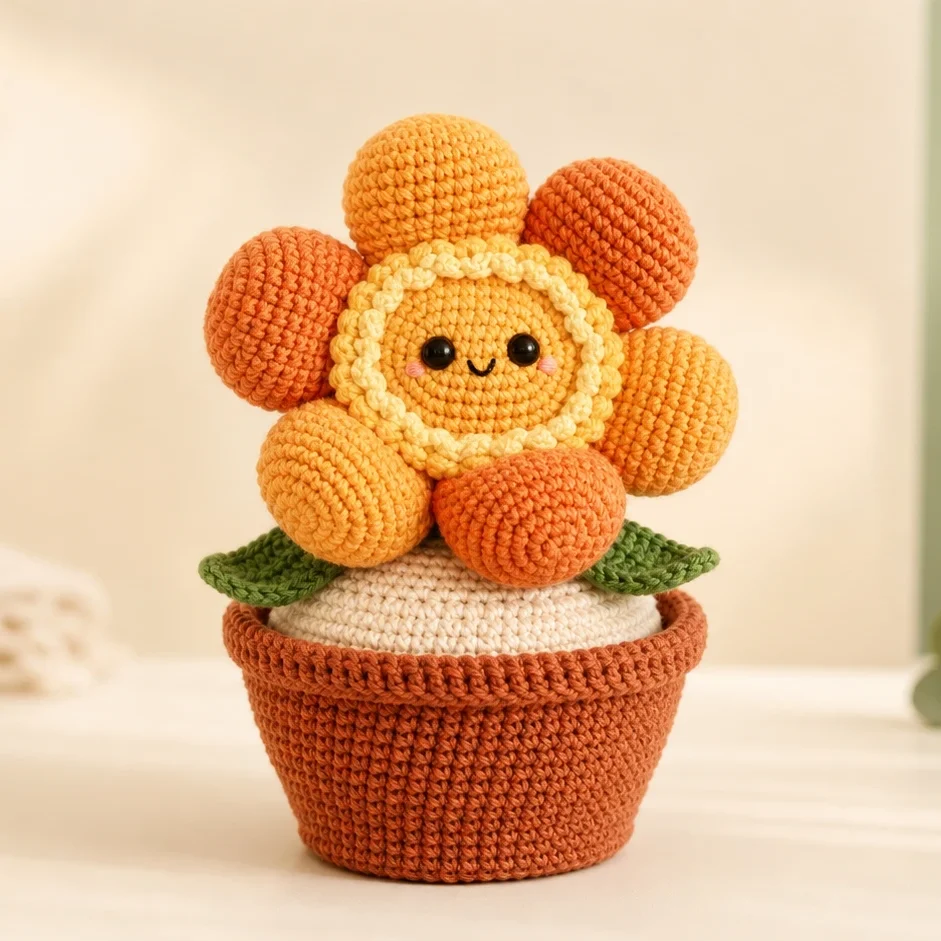
Say hello to Sunny, a cheerful potted flower with a warm orange bloom and a smiley golden face. The instructions below are written with simple crochet projects in mind, so each part is laid out round by round in US terms. Know how to make a magic ring and a single crochet? Then you already have what you need.
A flower like this is the kind of make people recommend as one of the better crochet projects for beginners. While you stitch it, you are quietly drilling the core moves: working in a spiral, increasing, decreasing, and joining small pieces into one finished toy. It feels like play, not practice.
One of the Easiest Crochet Projects to Start With
Here is why Sunny keeps showing up on lists of easy crochet projects:
- The main pieces only need a magic ring, single crochet, increases, and decreases.
- Each part is bite-sized, so you finish fast and rarely lose count.
- The pot tidies up the look, so even slightly uneven beginner rounds blend right in.
- It barely sips yarn, which makes it ideal for scraps and leftovers.
Materials & Tools You’ll Need
| What | Details |
|---|---|
| Yarn | Light worsted / DK cotton, around 50 g total across colors |
| Colors | Golden yellow (face center), orange and honey gold (petals), green (leaves and optional stem), terracotta or rust (pot), cream (pot filler) |
| Hook | 3.0 mm (US D/3), or drop a size if your fabric looks loose |
| Safety eyes | 2 pieces, 6 to 8 mm |
| Stuffing | Polyester fiberfill |
| Notions | Tapestry needle, stitch marker, scissors |
| Optional | Black embroidery floss for the mouth, dry pastel chalk for cheeks, a small cardboard circle for the pot base |
Abbreviations (US Terms)
This pattern is written in US crochet terms.
| Short | Meaning |
|---|---|
| MR | magic ring |
| st(s) | stitch(es) |
| rnd(s) | round(s) |
| sc | single crochet |
| hdc | half double crochet |
| dc | double crochet |
| inc | increase (2 sc in one st) |
| dec | decrease (2 sts worked together) |
| blo | back loop only |
| ch | chain |
| sl st | slip stitch |
| rep | repeat |
The number in parentheses after a round is the stitch count you should land on.
Notes & Gauge
- Everything is worked in continuous spiral rounds unless a piece says otherwise. A stitch marker in the first stitch of each round keeps you honest.
- Exact gauge does not matter much, but aim for snug tension so the stuffing stays hidden. Seeing fiberfill peek through means it is time to size down your hook.
- Reading UK patterns normally? Remember that US single crochet equals UK double crochet, so translate as you go.
- Finished size: about 13 cm (5 in) tall with the pot. Skill level: easy.
The Pattern
Flower Face (golden center)
The smiley middle of the bloom.
- Rnd 1: 6 sc in MR (6)
- Rnd 2: 6 inc (12)
- Rnd 3: (1 sc, inc) rep 6 times (18)
- Rnd 4: (2 sc, inc) rep 6 times (24)
- Rnd 5: (3 sc, inc) rep 6 times (30)
- Rnd 6: (4 sc, inc) rep 6 times (36)
- Rnds 7 to 9: sc in each st (36)
Stop and add the face. Set the safety eyes around Rnd 8, roughly 7 or 8 stitches apart, and snap the washers on inside. Stitch a small mouth just below and between the eyes. Cheeks can go on at the very end with a dab of pastel.
- Rnd 10: (4 sc, dec) rep 6 times (30)
- Rnd 11: (3 sc, dec) rep 6 times (24)
Begin stuffing, but keep the face on the flat side rather than a full round ball.
- Rnd 12: (2 sc, dec) rep 6 times (18)
- Rnd 13: (1 sc, dec) rep 6 times (12)
Top up the stuffing.
- Rnd 14: 6 dec (6)
Fasten off, leave a tail, and pull the hole shut.
Petals (make 5)
Soft, rounded petals that circle the face. Mixing orange and honey gold gives Sunny that warm two-tone look.
- Rnd 1: 6 sc in MR (6)
- Rnd 2: 6 inc (12)
- Rnd 3: (1 sc, inc) rep 6 times (18)
- Rnds 4 to 5: sc in each st (18)
- Rnd 6: (1 sc, dec) rep 6 times (12)
Add a little stuffing.
- Rnd 7: 6 dec (6)
Fasten off and leave a long tail for sewing.
Leaves (make 2)
Sunny’s pair of little arms.
- Ch 8.
- Beginning in the 2nd ch from the hook, work along the chain: 1 sc, 1 hdc, 2 dc, 1 hdc, 1 sc.
- Work 3 sc into the last chain to turn the tip.
- Spin the piece around and work back along the free loops of the starting chain: 1 sc, 1 hdc, 2 dc, 1 hdc, 1 sc.
- Sl st into the first stitch to close. Fasten off and leave a tail.
If hdc and dc are still new to you, work the whole leaf in sc instead. It comes out a bit flatter but still looks like a leaf.
Flower Pot
Built from the base upward.
- Rnd 1: 6 sc in MR (6)
- Rnd 2: 6 inc (12)
- Rnd 3: (1 sc, inc) rep 6 times (18)
- Rnd 4: (2 sc, inc) rep 6 times (24)
- Rnd 5: (3 sc, inc) rep 6 times (30)
- Rnd 6: (4 sc, inc) rep 6 times (36)
- Rnd 7: blo, sc in each st (36)
- Rnds 8 to 12: sc in each st (36)
- Rnd 13: (5 sc, inc) rep 6 times (42)
- Rnd 14: (6 sc, inc) rep 6 times (48)
- Rnd 15: sc in each st (48)
- Rnd 16: sl st in each st around for a clean rim (48)
Fasten off. For a pot that sits flat and steady, cut a small cardboard circle to fit the base and slip it inside.
Pot Filler (cream)
A firm little mound that props the flower up inside the pot.
- Rnd 1: 6 sc in MR (6)
- Rnd 2: 6 inc (12)
- Rnd 3: (1 sc, inc) rep 6 times (18)
- Rnd 4: (2 sc, inc) rep 6 times (24)
- Rnd 5: (3 sc, inc) rep 6 times (30)
- Rnd 6: (4 sc, inc) rep 6 times (36)
- Rnds 7 to 9: sc in each st (36)
- Rnd 10: (4 sc, dec) rep 6 times (30)
Stuff this one firmly.
- Rnd 11: (3 sc, dec) rep 6 times (24)
Fasten off and leave a long tail. The mound should drop into the pot and rest on the inner shoulder.
Optional Stem (green)
A short link that lifts the flower a little higher.
- Rnd 1: 6 sc in MR (6)
- Rnds 2 to 5: sc in each st (6)
Fasten off, leave a tail, and keep it mostly unstuffed. Leave this off if you would rather have the flower sit low in the pot.
Putting Sunny Together
- Space the 5 petals evenly around the back edge of the golden face, tucked slightly behind it so they frame the smile. Pin them, then sew each one down.
- Attach a leaf to each side, just under the face, so they poke out like arms.
- Stuff the cream mound firmly, lower it into the pot until the top sits near the rim, and tack it to the pot wall in a few places.
- Perch the flower on the mound and sew the base of the face (or the stem, if you added one) to the center so Sunny holds upright.
- For a hint of color, sweep a little dry pastel chalk onto a soft cloth, then onto the high points of the cheeks.
Care Instructions
- Hand wash gently in cool water with a drop of mild soap. Skip the wringing.
- Squeeze out water in a towel, smooth the shape back with your fingers, and lay flat to dry.
- A quick spot clean usually handles everyday dust.
- Making this for a baby or toddler? Leave out the safety eyes and embroider the eyes instead.
Terms of Use
This is an original pattern by Latifacha for latifacha.com. Feel free to make Sunny for yourself, for gifts, and to sell the finished toys you crochet from it. A link back to latifacha.com is welcome but not required.
Please do not copy, repost, translate, or resell the pattern itself, and please do not pass the design off as your own. Need anything? Email contact@latifacha.com.
FAQ
Is a potted flower a good first amigurumi?
It is one of the friendlier simple crochet projects to start with. The pieces are small, the stitches are basic, and the pot hides any wobbly early rounds, so a beginner result still looks neat.
What weight of yarn should I use?
DK or light worsted cotton is the sweet spot for projects like this. It keeps the shapes crisp and the flower firm. Acrylic works too and feels softer, just expect a slightly squishier finish.
How long does Sunny take to make?
Most people wrap it up across one or two easy evenings, which is exactly why it gets passed around as one of those quick crochet projects worth keeping on hand for gifts.
Can I change the colors?
Go for it. The orange and gold here is just one option. Pink and lilac give a softer daisy, while red or purple petals turn it into a whole different bloom. Mixing colors is part of what makes these such fun crochet projects to repeat.
How do I keep the flower from leaning?
The cream filler does the heavy lifting. Stuff it firmly, tack it to the pot wall, and sew the flower base to the top of the mound. Still tilting? Add the short green stem for a sturdier join.
What should I make after this one?
Once these shapes feel natural, you can branch into all sorts of crochet projects for beginners using the same magic-ring-and-increase rhythm: a matching bouquet, a swap to a classic terracotta plant, or tiny mushrooms and fruit built from the very same circles.