Dragon Crochet Pattern – Free Amigurumi Pattern
by Latifacha
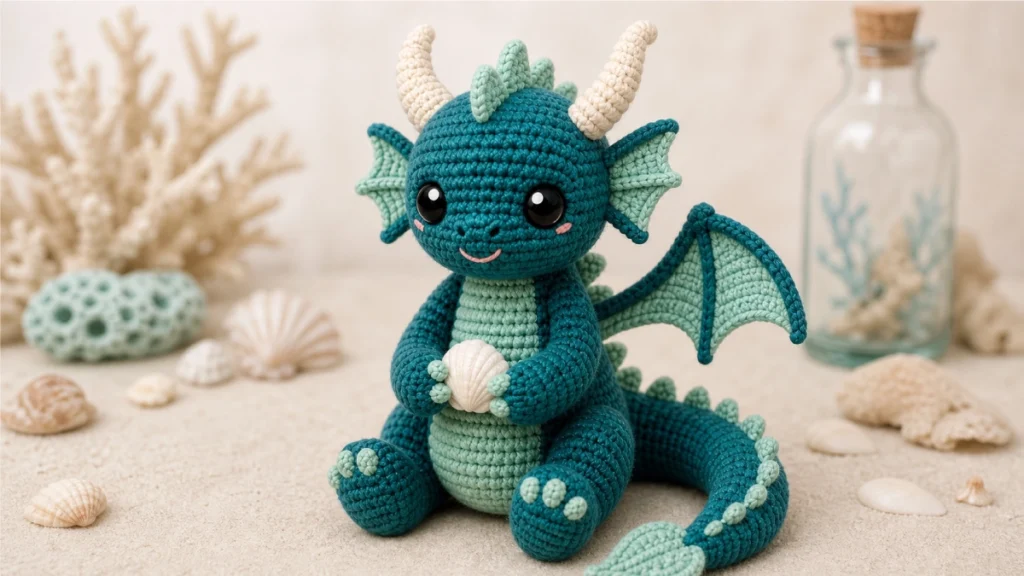
This little sea dragon sits about 20 cm tall, holds a cream seashell, and has the kind of round head and chunky paws that make a project worth finishing. If you have made a couple of basic amigurumi animals before, you already know almost everything you need for this one. It is a free amigurumi pattern, and you can read it here or save the downloadable copy for later.
The build is straightforward even though the dragon looks detailed. The head and body are two simple spheres. Everything that gives the dragon its character (the horns, the wings, the row of soft spikes, the curling tail) is a small separate piece that you sew on at the end. That means you can stop and start whenever you like, and you can tweak the colours without touching the main shaping.
I have written every round in US crochet terms with the stitch count in brackets, the same way the rest of the patterns on the site are laid out. If you are after more free crochet animal patterns once this one is done, the dragon pairs nicely with the other woodland and farm characters in the same size range.
Materials & Tools You’ll Need
Yarn — DK (light worsted) cotton works best for crisp stitch definition. Suggested brands: Paintbox Cotton DK, Scheepjes Catona (used double or a DK equivalent), or Ricorumi DK.
- Teal — main body, head, outer arms and legs, tail, wing frames, ears (about 50 g)
- Soft sage green — belly patch, paw pads, hands, wing membrane, spikes, tail tip (about 25 g)
- Cream / ecru — horns and the seashell (small amount, about 10 g)
- Pink — a few centimetres for the cheeks and mouth, or use a scrap of pink felt
Hook
- 3.0 mm crochet hook (go down a size from the yarn band so the stuffing does not show through)
Notions
- One pair of 12–14 mm safety eyes
- Polyester fibrefill stuffing
- Tapestry / yarn needle
- Stitch marker
- Small sharp scissors
- A little pink embroidery thread or felt for the cheeks (optional)
Skill level: Easy to intermediate
Finished size: about 20 cm / 8 inches tall, sitting
Abbreviations
All instructions use US crochet terminology.
| Abbreviation | Meaning |
|---|---|
| MR | magic ring |
| ch | chain |
| st(s) | stitch(es) |
| sc | single crochet |
| hdc | half double crochet |
| dc | double crochet |
| sl st | slip stitch |
| inc | increase (2 sc in one st) |
| dec | decrease (2 sc together, invisible decrease preferred) |
| BLO | back loops only |
| FLO | front loops only |
| rnd(s) | round(s) |
| (…) × n | repeat the sequence in brackets n times |
Notes & Gauge
- Work in continuous spirals (no joining or turning) unless a piece is worked in rows. Move your stitch marker up at the start of every round.
- Gauge is not critical for a toy, but keep it tight. Loose stitches let the stuffing peek through. If you can see white through your fabric, drop a hook size.
- Stitch counts are in bold brackets at the end of each round.
- Stuff firmly as you close the head and body, and only lightly stuff the arms, tail and horns so they stay bendable.
- This is a free pattern to download, so feel free to print it and scribble your own colour notes in the margin.
The Pattern
Head (teal)
- Rnd 1: 6 sc in MR. (6)
- Rnd 2: 6 inc. (12)
- Rnd 3: (1 sc, inc) × 6. (18)
- Rnd 4: (2 sc, inc) × 6. (24)
- Rnd 5: (3 sc, inc) × 6. (30)
- Rnd 6: (4 sc, inc) × 6. (36)
- Rnd 7: (5 sc, inc) × 6. (42)
- Rnds 8 – 13: 42 sc (6 rounds).
- Rnd 14: (5 sc, dec) × 6. (36)
- Rnd 15: (4 sc, dec) × 6. (30)
- Rnd 16: (3 sc, dec) × 6. (24)
Set the safety eyes between rounds 9 and 10, about 7 stitches apart. Once they are in, start stuffing firmly.
- Rnd 17: (2 sc, dec) × 6. (18)
- Rnd 18: (1 sc, dec) × 6. (12)
- Rnd 19: 6 dec. (6)
Add the last bit of stuffing, then close the hole with the tail. Leave a long tail for sewing the head to the body.
Body (teal)
- Rnd 1: 6 sc in MR. (6)
- Rnd 2: 6 inc. (12)
- Rnd 3: (1 sc, inc) × 6. (18)
- Rnd 4: (2 sc, inc) × 6. (24)
- Rnd 5: (3 sc, inc) × 6. (30)
- Rnd 6: 30 sc BLO (this gives the base a flat seat to sit on).
- Rnds 7 – 11: 30 sc (5 rounds).
- Rnd 12: (3 sc, dec) × 6. (24)
- Rnds 13 – 14: 24 sc (2 rounds).
- Rnd 15: (2 sc, dec) × 6. (18)
- Rnd 16: 18 sc.
Stuff the body firmly. Fasten off and leave a long tail. Do not close the opening; you will sew the head onto it.
Belly patch (sage green)
A flat oval sewn onto the front of the body.
- Rnd 1: Ch 7. Starting in the 2nd ch from the hook: 5 sc, 3 sc in the last ch, then along the opposite side of the chain: 4 sc, 2 sc in the final ch. (14)
- Rnd 2: 1 inc, 4 sc, (1 inc) × 3, 4 sc, (1 inc) × 2. (20)
- Rnd 3: 20 sc.
Fasten off, leaving a long tail.
Arms (make 2 — sage hand, teal arm)
With sage green:
- Rnd 1: 4 sc in MR. (4)
- Rnd 2: 4 inc. (8)
- Rnd 3: 8 sc.
Change to teal:
- Rnd 4: (2 sc, dec) × 2. (6)
- Rnds 5 – 9: 6 sc (5 rounds).
Stuff the lower half lightly. Flatten the opening and work 3 sc through both sides to close. Leave a tail. (Optional: embroider three short cream lines on the sage hand for little claws.)
Legs (make 2 — sage foot pad, teal leg)
With sage green:
- Rnd 1: 6 sc in MR. (6)
- Rnd 2: 6 inc. (12)
- Rnd 3: (1 sc, inc) × 6. (18)
- Rnds 4 – 5: 18 sc (2 rounds).
Change to teal:
- Rnd 6: 18 sc BLO.
- Rnd 7: 4 sc, (dec) × 5, 4 sc. (13)
- Rnd 8: 3 sc, (dec) × 3, 4 sc. (10)
- Rnds 9 – 11: 10 sc (3 rounds).
Stuff. Leave the top open and leave a long tail to sew to the body.
Ears (make 2 — teal)
- Rnd 1: 4 sc in MR. (4)
- Rnd 2: 4 inc. (8)
- Rnd 3: 8 sc.
- Rnd 4: (2 sc, dec) × 2. (6)
Flatten without stuffing. Fasten off, leave a tail. (Optional: work rounds 1–2 in sage so a little green shows on the inner ear.)
Horns (make 2 — cream)
- Rnd 1: 4 sc in MR. (4)
- Rnd 2: 4 sc.
- Rnd 3: (1 sc, inc) × 2. (6)
- Rnd 4: 6 sc.
- Rnd 5: (2 sc, inc) × 2. (8)
- Rnd 6: 8 sc.
- Rnd 7: (3 sc, inc) × 2. (10)
- Rnd 8: 10 sc.
Stuff the bottom half only and leave the tip hollow so the horn keeps a slight curve. Leave a tail.
Spikes / crest (sage green — make about 6 for the head and back, plus 4 for the tail)
Each spike is a tiny soft triangle:
- Ch 4. Starting in the 2nd ch from the hook: 1 sc, 1 hdc, 3 sc in the last ch, then along the opposite side of the chain: 1 hdc, 1 sc.
Fasten off and leave a tail. Make as many as you like; more spikes give a fuller crest.
Wings (make 2 — sage membrane, teal edge)
Worked in rows. With sage green:
- Ch 10.
- Row 1: sc in 2nd ch from hook, sc in each ch across. Ch 1, turn. (9)
- Row 2: 9 sc. Ch 1, turn. (9)
- Row 3: dec, 5 sc, dec. Ch 1, turn. (7)
- Row 4: 7 sc. Ch 1, turn. (7)
- Row 5: dec, 3 sc, dec. Ch 1, turn. (5)
- Row 6: 5 sc. Ch 1, turn. (5)
- Row 7: dec, 1 sc, dec. (3)
Fasten off sage. Join teal at any corner and sc evenly all the way around the wing. Along the longer (foundation) edge, work three evenly spaced scallops by making (sc, ch 3, sc) into the same stitch at three points. This gives the fingered, bat-wing look. Fasten off and leave a tail.
Tail (teal)
- Rnd 1: 6 sc in MR. (6)
- Rnd 2: (2 sc, inc) × 2. (8)
- Rnds 3 – 4: 8 sc (2 rounds).
- Rnd 5: (3 sc, inc) × 2. (10)
- Rnds 6 – 8: 10 sc (3 rounds).
- Rnd 9: (4 sc, inc) × 2. (12)
- Rnds 10 – 15: 12 sc (6 rounds).
Stuff lightly so the tail still bends. Leave the end open and leave a long tail to sew to the body.
Tail leaf tip (sage green)
A small flat leaf sewn over the open end of the tail.
- Ch 5. Starting in the 2nd ch from the hook: 3 sc, 5 sc in the last ch, then along the opposite side: 3 sc, 2 sc in the final ch. (13)
Sl st to join, fasten off, and leave a tail.
Seashell (optional — cream)
- Ch 2. Work 7 dc in the 2nd ch from the hook. Turn the fan so the flat edge is at the bottom.
- Ch 1, then along the curved top edge work (sc, ch 2, sc) into each gap for the scalloped rim.
- With cream and a tapestry needle, work three surface slip-stitch lines from the flat base out to the rim to make the shell ridges.
Fasten off.
Assembly
Work in this order so each piece has something to anchor to.
- Belly patch. Pin the sage oval to the centre front of the body and sew all the way around.
- Head to body. Sit the head on top of the body opening and whip-stitch right around the join. Push a little extra stuffing into the neck as you go so the head stays upright instead of flopping forward.
- Legs. Sew the open tops to the lower front of the body, set slightly apart so the dragon sits flat with its feet forward.
- Arms. Sew the flattened tops to the sides of the body, just below the head, angled forward so the hands can hold the shell.
- Ears. Place them on the sides of the head, around rounds 6–7, angled outward.
- Horns. Sew them on top of the head, just in front of the ears, curving back.
- Spikes. Sew a line of spikes from between the horns down the back of the head and onto the body. Sew the remaining spikes along the top of the tail.
- Wings. Pin both wings to the upper back, matching the angle on each side before you sew, then stitch the foundation edge of each wing to the body.
- Tail. Sew the open end of the tail to the lower back, then sew the sage leaf tip flat over the end.
- Shell. Tuck the seashell between the hands and tack it in place with a few stitches.
The face
- Cheeks: two small pink circles, embroidered with satin stitches or cut from felt and glued, set just under and slightly outside the eyes.
- Nostrils: two tiny straight stitches in teal (or a slightly darker shade) on the front of the snout.
- Mouth: a small pink curved stitch below the nostrils, with a short downward stitch in the middle for a soft smile.
Tips, Substitutions & Variations
- Symmetry is the part that trips people up. Before you sew the wings, ears or horns, pin both sides first and look at the dragon straight on. It is much easier to move a pin than to unpick yarn.
- Keep the tail bendable. Under-stuffing the tail lets you pose it curling around the body the way it sits in the photo. A fully stuffed tail goes stiff and straight.
- Colour swaps. This shape is not tied to a sea theme. A purple body with lilac wings, or a soft grey with pink accents, both read clearly as a dragon. Swap the cream shell for a tiny crocheted star or a heart if you want a different prop.
- Yarn choice. Cotton gives the sharpest stitch definition and holds the dragon’s shape. A chenille or velvet yarn makes a softer, cuddlier version, but the stitch counts get harder to see, so count carefully.
- No safety eyes on hand? For a baby-safe toy, embroider the eyes with black yarn instead. Skip the plastic eyes entirely if the dragon is going to a child under three.
Care Instructions
Hand wash in cool water with a little mild detergent. Press the water out gently, never wring, since wringing can pull the stuffing out of shape. Reshape while damp and lay flat to dry, away from direct heat. If the surface looks fuzzy over time, a quick going-over with a fabric shaver tidies it up.
Terms of Use & Copyright
This pattern is free for personal use. You are welcome to make this dragon for yourself, as a gift, or to sell finished items in small quantities with credit to Latifacha at latifacha.com.
Please do not copy, republish, translate, or redistribute the pattern text itself, and do not claim it as your own. Sharing a link to this page is always welcome. Questions can go to contact@latifacha.com.
Frequently Asked Questions
What yarn weight is best for this amigurumi dragon?
DK (light worsted) cotton with a 3.0 mm hook gives the cleanest result and the 20 cm finished size in this pattern. Worsted weight with a 3.5–4 mm hook will produce a slightly larger dragon and use more yarn.
Is this really a free crochet pattern to download?
Yes. The full pattern is free to read on the page and free to save or print for your own use. The only thing that is not free to share is the pattern text itself, which stays the property of Latifacha.
How long does it take to make?
Most crocheters finish this dragon over a weekend, roughly six to ten hours of work spread across the head, body, and all the small pieces. The sewing and assembly take longer than people expect, so give that step its own session.
Can a beginner make this dragon?
If you can crochet a magic ring, single crochet in a spiral, increase, and decrease, you can make this. The wings and the assembly are the most fiddly parts. Working a simpler amigurumi animal pattern first will make the sewing feel much easier.
How do I keep the head from flopping over?
Stuff both the head and the neck area firmly, and add extra stuffing into the join while you sew the head to the body. A well-packed neck is what holds the head upright. A loosely stuffed one will always tip forward.
Looking for more free crochet animal patterns? New amigurumi characters are added to latifacha.com regularly, all written in the same clear, round-by-round style.