Baby Dragon Crochet Pattern
by Latifacha
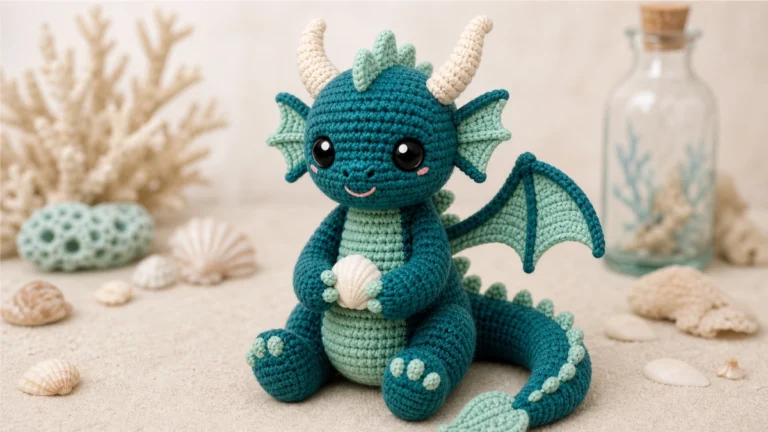
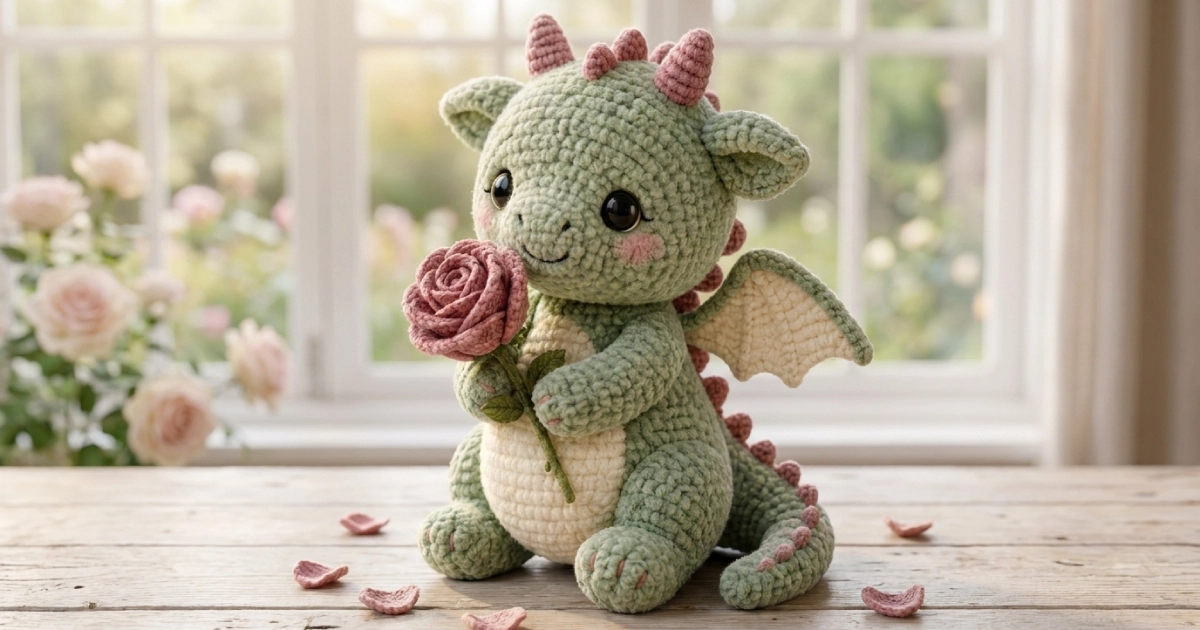
If you have been collecting soft, round, slightly grumpy-but-friendly creatures to make next, this little dragon belongs near the top of the list. He sits up on his own, holds a tiny rose if you want him to, and works up in plush velvet yarn so the whole thing feels like a marshmallow when you are done. This is one of those crochet ideas that looks fancy in photos and is honestly very forgiving to make, which is a nice combination.
The pattern below is written for confident beginners. If you can work a magic ring, single crochet in rounds, increase, and decrease, you already know almost everything you need. The few extra pieces (horns, a ridge of spikes, small wings) are tiny and quick, and I will walk you through where each one goes.
You will find plenty of free crochet animal patterns floating around online, but most chunky dragons are either too detailed for a weekend or too plain to feel special. This one sits in the middle. It reads as a real character without asking you to color-change mid-round or count to fifty.
Like the rest of the free crochet patterns on latifacha.com, this is yours to make as many times as you like. Save the page, or copy the text below if you prefer free crochet patterns to download and keep offline for your project bag.
Materials & Tools You’ll Need
Yarn (chenille / velvet weight, roughly worsted to bulky):
- Sage green — about 100 g. This is the main color (head, body, arms, legs, tail, wings, ears).
- Warm cream / ivory — about 20 g. Belly panel, and the inner wing edge if you want the two-tone look.
- Mauve / dusty pink — about 25 g. Horns, the row of back spikes, the tail tip, and the rose.
- A small length of green (any leftover) for the rose stem and leaf, optional.
Velvet yarns that work well for this kind of plush include Bernat Velvet, Himalaya Dolphin Baby, and YarnArt Dolce. Any soft chenille in a similar thickness is fine.
Hook:
- 4 mm (G) crochet hook. Go down half a size if your stitches look loose, since you do not want stuffing peeking through.
Notions:
- Two 12 mm safety eyes (black).
- Polyester fiberfill stuffing.
- A yarn needle with a large eye.
- A stitch marker (or a scrap of contrast yarn).
- Scissors.
- A little black or dark brown embroidery thread for the smile, plus a touch of pink yarn for the toes.
Abbreviations
All instructions use US crochet terminology.
| Short | Meaning |
|---|---|
| MR | magic ring |
| ch | chain |
| sc | single crochet |
| hdc | half double crochet |
| dc | double crochet |
| inc | increase (2 sc in one stitch) |
| dec | decrease (single crochet 2 together) |
| st(s) | stitch(es) |
| Rnd | round |
| BLO | back loops only |
| FLO | front loops only |
| ( ) × n | repeat what’s in brackets n times |
The number in bold at the end of a round is your stitch count for that round.
Notes & Gauge
- Skill level: Easy / confident beginner.
- Finished size: about 22 cm (8.5 in) tall in the seated pose, using velvet yarn and a 4 mm hook. Thinner yarn gives you a smaller dragon, thicker yarn a bigger one.
- Worked in continuous spiral rounds (no joining or turning) unless a piece says otherwise. Move your stitch marker up as you go.
- Velvet yarn tip: it is soft and lovely, but it is also slippery and the individual stitches hide easily. Count by feel and by your marker rather than trying to see each loop. If you lose your place, a flashlight held behind the work helps the stitches show up.
- US vs UK: US single crochet is the same stitch UK crocheters call double crochet. If you usually work in UK terms, read every “sc” here as your “dc.”

The Pattern
Make the pieces in any order. I usually do the body and head first so I can see the dragon take shape, then the small bits.
Head
Worked in sage green, bottom of the chin upward.
- Rnd 1: 6 sc in MR. (6)
- Rnd 2: inc × 6. (12)
- Rnd 3: (sc, inc) × 6. (18)
- Rnd 4: (2 sc, inc) × 6. (24)
- Rnd 5: (3 sc, inc) × 6. (30)
- Rnd 6: (4 sc, inc) × 6. (36)
- Rnd 7: (5 sc, inc) × 6. (42)
- Rnds 8–13: sc in every st. (42) (6 rounds)
Insert the safety eyes between Rnd 10 and Rnd 11, leaving about 7 stitches between them. Set them now while you can still reach inside.
- Rnd 14: (5 sc, dec) × 6. (36)
- Rnd 15: (4 sc, dec) × 6. (30)
- Rnd 16: (3 sc, dec) × 6. (24)
- Rnd 17: (2 sc, dec) × 6. (18) — start stuffing firmly here.
- Rnd 18: (sc, dec) × 6. (12)
- Rnd 19: dec × 6. (6)
Finish stuffing, then close the hole with the yarn tail. Set aside.
Body
Worked in sage green, a rounded sitting shape.
- Rnd 1: 6 sc in MR. (6)
- Rnd 2: inc × 6. (12)
- Rnd 3: (sc, inc) × 6. (18)
- Rnd 4: (2 sc, inc) × 6. (24)
- Rnd 5: (3 sc, inc) × 6. (30)
- Rnd 6: (4 sc, inc) × 6. (36)
- Rnd 7: (5 sc, inc) × 6. (42)
- Rnds 8–15: sc in every st. (42) (8 rounds)
- Rnd 16: (5 sc, dec) × 6. (36)
- Rnds 17–18: sc in every st. (36)
- Rnd 19: (4 sc, dec) × 6. (30)
- Rnd 20: sc in every st. (30)
- Rnd 21: (3 sc, dec) × 6. (24) — stuff firmly as you close in.
- Rnd 22: sc in every st. (24)
Fasten off and leave a long tail for sewing the head on later. Do not close the top; the head sits over this opening.
Belly Panel
Worked in cream. This is a flat circle you will sew to the front of the body and gently stretch into an oval as you pin it.
- Rnd 1: 6 sc in MR. (6)
- Rnd 2: inc × 6. (12)
- Rnd 3: (sc, inc) × 6. (18)
- Rnd 4: (2 sc, inc) × 6. (24)
Slip stitch to finish and leave a long tail. Done.
Arms (make 2)
Worked in sage green. These are short and curl toward the front so the dragon can hold the rose.
- Rnd 1: 6 sc in MR. (6)
- Rnd 2: (sc, inc) × 3. (9)
- Rnds 3–8: sc in every st. (9) (6 rounds)
Stuff the bottom half only, very lightly, so the arm stays bendable. Flatten the top opening and work 4 sc through both sides to close. Leave a tail.
Legs / Feet (make 2)
Worked in sage green. Chunky little feet that the dragon sits on.
- Rnd 1: 6 sc in MR. (6)
- Rnd 2: inc × 6. (12)
- Rnd 3: (sc, inc) × 6. (18)
- Rnds 4–5: sc in every st. (18)
- Rnd 6: (sc, dec) × 6. (12)
- Rnds 7–9: sc in every st. (12)
Stuff. Flatten the top opening and work 6 sc through both sides to close. Leave a tail.
Tail
Worked from the tip down, starting in mauve, then changing to sage green.
With mauve:
- Rnd 1: 6 sc in MR. (6)
- Rnd 2: sc in every st. (6)
Change to sage green:
- Rnd 3: sc in every st. (6)
- Rnd 4: (2 sc, inc) × 2. (8)
- Rnd 5: sc in every st. (8)
- Rnd 6: (3 sc, inc) × 2. (10)
- Rnd 7: sc in every st. (10)
- Rnd 8: (4 sc, inc) × 2. (12)
- Rnds 9–10: sc in every st. (12)
Stuff very lightly so the tail can still curve. Flatten the opening, work 6 sc to close, and leave a long tail for sewing.
Wings (make 2)
Worked flat in sage green, turning at the end of each row. These are small and sit high on the back.
- Row 1: ch 8; sc in 2nd ch from hook and in each ch across. (7) ch 1, turn.
- Row 2: sc in each st across. (7) ch 1, turn.
- Row 3: sc in next 5, leave the last 2 unworked. (5) ch 1, turn.
- Row 4: sc in next 3, leave the last 2 unworked. (3) ch 1, turn.
- Row 5: sc in next 3. (3)
Fasten off, leaving a tail. You now have a stepped triangle. For the soft bat-wing edge, you can work a row of cream along the long slanted side as (sc, ch 2) repeated into each step. Skip the cream if you want a plain wing.
Ears (make 2)
Worked in sage green, small and floppy.
- Rnd 1: 6 sc in MR. (6)
- Rnd 2: (sc, inc) × 3. (9)
- Rnd 3: sc in every st. (9)
Do not stuff. Flatten and work 4 sc across the opening to close. Pinch the base. Leave a tail.
Horns (make 2)
Worked in mauve, small stubby cones.
- Rnd 1: 4 sc in MR. (4)
- Rnd 2: sc in every st. (4)
- Rnd 3: (sc, inc) × 2. (6)
- Rnd 4: sc in every st. (6)
- Rnd 5: (2 sc, inc) × 2. (8)
- Rnd 6: sc in every st. (8)
Stuff lightly. Leave a tail.
Back Spikes (make about 8)
Worked in mauve. These are tiny graduated points that run from the top of the head down the spine to the tail.
For each spike: ch 5, then sl st in the 2nd ch from hook, sc in next ch, hdc in next ch, dc in last ch. Fasten off, leaving a tail.
Make a few with ch 4 and a few with ch 6 as well, so you have a mix of small, medium, and slightly larger points. The bigger ones go in the middle of the back, the small ones at the head and tail.
Rose (optional)
Worked in mauve.
- ch 20.
- Row 1: 2 dc in the 3rd ch from hook, then 2 dc in each ch across. Fasten off, leaving a long tail.
Roll the strip up from one end to make a spiral rose, keeping the bottom edge level. Stitch through the base a few times to hold the roll together. For a stem, ch 8 in green, fasten off, and sew it to the underside of the rose. A small green leaf (ch 6, sc and hdc back along it) is a nice touch if you want one.
Assembly
Take your time pinning before you sew. Velvet hides seams beautifully, so small mistakes disappear once it is all together.
- Belly panel onto the body. Center the cream circle on the front of the body, stretching it gently into a tall oval so it covers most of the tummy. Pin, then sew all the way around with the cream tail.
- Head onto the body. Sit the head over the body opening and pin. Add a little more stuffing into the join as you sew so the neck stays firm and the head does not flop. Whip stitch all the way around.
- Legs. Sew the two feet to the front-bottom of the body, side by side, angled slightly outward so the dragon sits flat and stable.
- Arms. Sew the arms to the sides of the body, fairly high and angled forward so they meet in front. If you are adding the rose, tuck it between the paws and tack it in place.
- Tail. Sew the wide end of the tail to the lower back, curving it around to one side.
- Wings. Sew the straight short edge of each wing to the upper back, one on each side, so the points face outward and slightly up.
- Ears. Sew one on each side of the head, roughly level with the eyes, angled out.
- Horns. Sew the two horns to the top of the head, set a little apart and tilted back.
- Back spikes. Lay the spikes in a line from between the horns, down the center of the back, and onto the tail. Pin the whole row first to get the spacing even, smallest at the ends and largest in the middle, then sew each one down by its base.
- Face details. With dark embroidery thread, work a small soft smile under and between the eyes. For the blush, you can use a dab of cosmetic blusher on the cheeks or stitch two small pink ovals. Add two or three short pink stitches across the front of each foot for toes.
Tips, Substitutions & Variations
- No velvet yarn? A soft acrylic worsted works fine and is easier to see while you stitch. Your dragon will be a touch smaller and less fuzzy, which some people actually prefer for a cleaner look.
- Worried about the eyes for a baby or pet? Skip the safety eyes and embroider them instead with black yarn. Two satin-stitched ovals with a tiny white highlight look very close to the photo.
- Different colors. This shape works as any color dragon. A soft blue body with white belly, or a butter-yellow body with peach spikes, both look great. The construction never changes.
- Floppier vs. firmer. Stuff the head and body firmly so they hold their round shape, but keep the arms, tail, and wings soft so the dragon stays poseable.
- Lost your stitch count in the velvet? Drop in a marker every 6 stitches on the long plain rounds. It saves a lot of frogging.
Care Instructions
Hand wash in cool water with a little mild soap. Do not wring velvet yarn, since it can shed and stretch when twisted. Press the water out gently in a towel and let the dragon air dry, away from direct heat. Give the fur a soft brush with your fingers once it is dry to fluff it back up. If you added safety eyes, keep the dragon away from very hot water so the backings stay secure.
Terms of Use & Copyright
This pattern is free for personal use. You are welcome to make this baby dragon for yourself, as a gift, or to sell finished pieces you make by hand in small amounts, and a credit to latifacha.com is always appreciated. Please do not copy, repost, translate, or sell the pattern text or photos as your own. If you would like to share the pattern, link back to the original post on latifacha.com rather than reposting the instructions. Questions are welcome at contact@latifacha.com.
Frequently Asked Questions
How much yarn do I need for this crochet baby dragon?
For one dragon in velvet yarn you need roughly 100 g of your main sage color, about 25 g of mauve, and about 20 g of cream. One regular skein of the main color is plenty, and the contrast colors are small enough that leftovers from other projects will usually cover them.
Is this baby dragon a good pattern for beginners?
Yes. If you are comfortable with the magic ring, single crochet, increasing, and decreasing, you can make this. The small pieces look detailed but each one is only a few rounds, so they are quick wins rather than hard parts. It is a friendly step up from a plain ball-shaped amigurumi.
What size hook and yarn should I use?
A 4 mm hook with chenille or velvet yarn gives the soft, plump look in the photos and a finished height of about 22 cm. You can use a worsted acrylic with the same hook for a slightly smaller, smoother dragon. The key is keeping your stitches tight enough that stuffing does not show through.
Can I sell what I make from this pattern?
You can sell the finished dragons you crochet yourself, in small handmade quantities. What you cannot do is sell or republish the written pattern or the photos. Crediting latifacha.com when you list your finished item is appreciated but not required.
Where can I find more free crochet animal patterns like this one?
There are more amigurumi crochet patterns free to make on latifacha.com, including other soft animal characters worked in the same beginner-friendly style. If you enjoy free crochet patterns to download and keep, the dragon here is a good template to start a small collection of matching plush friends.