Easy Crochet Bunny Pattern: Clover the Plush Bunny
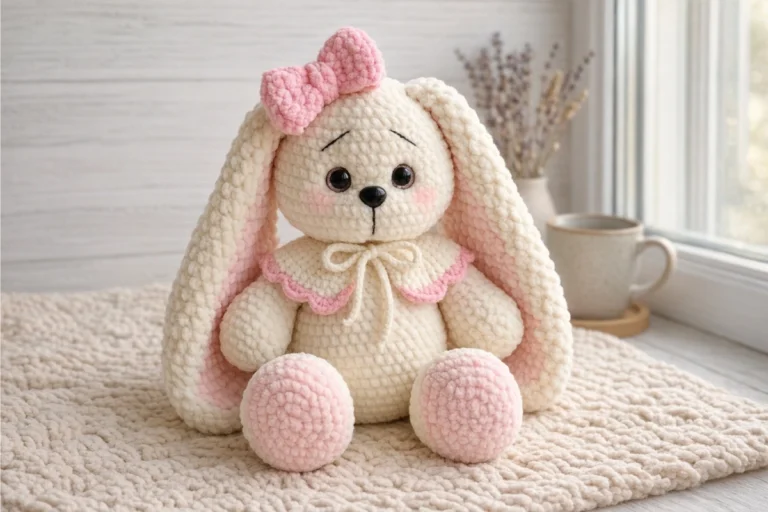
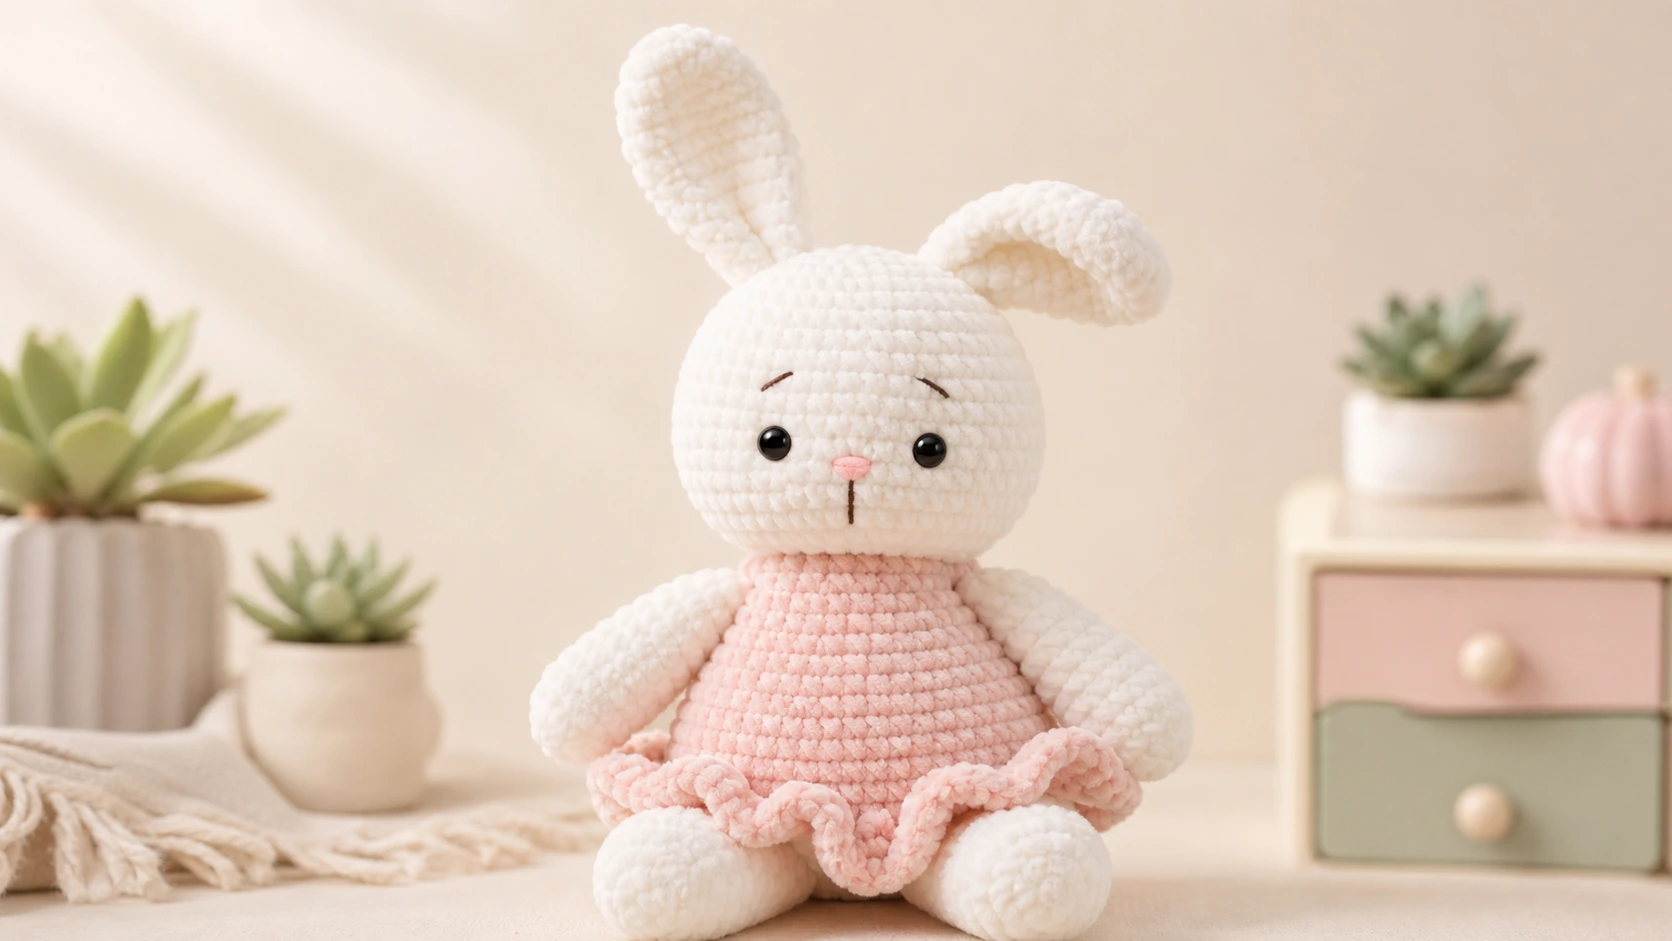
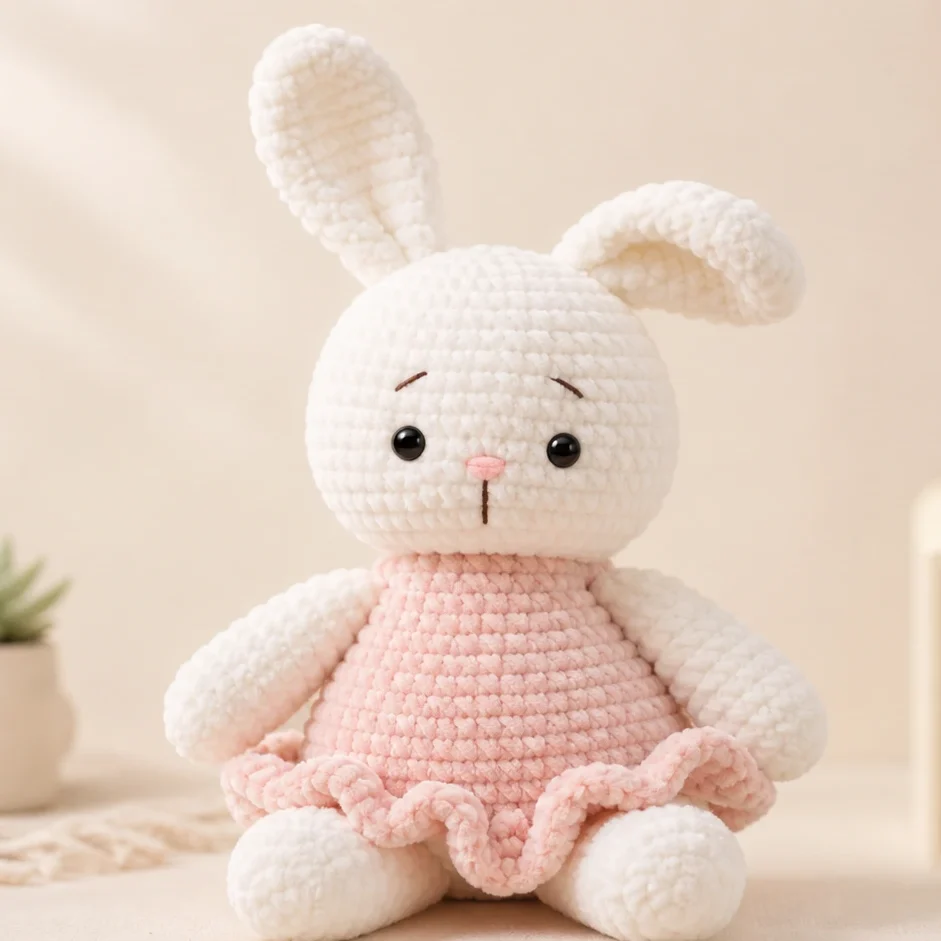
Some toys just want to be cuddled, and Clover is one of them. She is a round, squishy bunny in a soft blush dress, worked in plush chenille yarn so she ends up about as huggable as a small pillow. If you have been hunting for an easy crochet bunny pattern that does not throw twenty different stitches at you, she is a gentle place to start.
Clover is built from seven separate pieces. You crochet a head, a body, two arms, two legs, two ears, and a little ruffled dress, then sew everything together at the end. Nothing overlaps, nothing has to be joined while you work except the dress, and there is no point where you are juggling two colours at once on the same piece. That is exactly what makes her friendly for a first or second amigurumi.
She stands around 30 cm tall and the whole thing relies on four moves you have probably already met: the magic ring, single crochet, increases, and decreases. The dress adds one new stitch, the double crochet, and that is the hardest thing in the pattern.
Meet Clover
A quick note on why this make works so well for newer crocheters before we get into the pattern itself.
- She is forgiving. Plush yarn is fuzzy, so slightly uneven tension and the occasional miscount vanish into the texture. Beginners stress about neatness, and this yarn quietly hides a lot of it.
- She comes in pieces. Working flat-then-sew is much less intimidating than a single complicated shape. If one piece goes wrong, you redo that one piece, not the whole toy.
- She is quick. Each component works up fast, so you get steady little wins instead of one long slog.
- She grows with you. Once you can make Clover, swapping the dress colour, adding a bow, or giving her a tiny carrot are all easy next steps that use skills you already have.
What you’ll need to crochet Clover
| Item | Details |
|---|---|
| White chenille / velvet yarn | Around 90 to 100 g. Sport or light worsted weight plush yarn (the soft, fuzzy kind). |
| Blush pink chenille / velvet yarn | A small amount, about 25 to 30 g, for the dress. |
| Safety eyes | 14 mm, one pair. |
| Brown embroidery thread | For the eyebrows and muzzle. |
| Pink embroidery thread | For the nose. |
| Crochet hook | 5 mm. |
| Stuffing | Polyester fiberfill. |
| Tapestry needle | For sewing and embroidering the face. |
| Stitch marker | Even a loop of contrast yarn works. |
| Scissors |
Crochet abbreviations (US terms)
This pattern is written in US crochet terminology.
| Short | Meaning |
|---|---|
MR | magic ring |
ch | chain |
sc | single crochet |
dc | double crochet |
inc | increase (2 sc in the same stitch) |
dec | decrease (single crochet 2 stitches together) |
sl st | slip stitch |
Rnd | round |
( ) x N | repeat the bracketed part N times |
Before you start: size, gauge and notes
- Skill level: easy. Magic ring, single crochet, increase, decrease, plus one double crochet for the dress.
- Finished size: roughly 30 cm / 12 inches tall with the materials listed. Different yarn or hook will change that, so read it as a ballpark.
- Gauge: amigurumi does not need a strict gauge. The only thing that matters is a tight enough fabric that no stuffing shows through. If you can see fiberfill through the stitches, go down a hook size.
- Working in a spiral: the head, body, arms, and legs are all worked in a continuous round with no joining. Mark the start of each round and move the marker up as you go so you never lose your place.
- Reading the counts: the bold number in brackets at the end of each round is your stitch total at that point. Pause and count after every increase or decrease round.
Clover the Bunny: step-by-step pattern
Make all seven pieces first, then head to the assembly section.
Head (white)
Stuff firmly as you close it up.
- Rnd 1: 6 sc into a MR (6)
- Rnd 2: inc x6 (12)
- Rnd 3: (sc, inc) x6 (18)
- Rnd 4: (2 sc, inc) x6 (24)
- Rnd 5: (3 sc, inc) x6 (30)
- Rnd 6: (4 sc, inc) x6 (36)
- Rnd 7: (5 sc, inc) x6 (42)
- Rnd 8 to 14: 42 sc (7 rounds) (42)
Place the safety eyes between rounds 11 and 12, about 7 stitches apart. Once the washers are pushed on they will not budge, so check the spacing before you commit.
- Rnd 15: (5 sc, dec) x6 (36)
- Rnd 16: (4 sc, dec) x6 (30)
- Rnd 17: (3 sc, dec) x6 (24)
- Rnd 18: (2 sc, dec) x6 (18)
Begin stuffing now and keep topping it up as you finish.
- Rnd 19: (sc, dec) x6 (12)
- Rnd 20: dec x6 (6)
Fasten off with a long tail, run it through the last 6 stitches, and pull the opening shut.
Body (white)
- Rnd 1: 6 sc into a MR (6)
- Rnd 2: inc x6 (12)
- Rnd 3: (sc, inc) x6 (18)
- Rnd 4: (2 sc, inc) x6 (24)
- Rnd 5: (3 sc, inc) x6 (30)
- Rnd 6 to 9: 30 sc (4 rounds) (30)
- Rnd 10: (3 sc, dec) x6 (24)
- Rnd 11 to 12: 24 sc (2 rounds) (24)
- Rnd 13: (2 sc, dec) x6 (18)
- Rnd 14 to 15: 18 sc (2 rounds) (18)
Stuff the body firmly.
- Rnd 16: (sc, dec) x6 (12)
Fasten off with a long tail for joining the body to the head.
Arms (white) — make 2
Stuff the lower half only, and only lightly. The tops stay flat for easy sewing.
- Rnd 1: 6 sc into a MR (6)
- Rnd 2: inc x6 (12)
- Rnd 3 to 4: 12 sc (2 rounds) (12)
- Rnd 5: (sc, dec) x4 (8)
- Rnd 6 to 12: 8 sc (7 rounds) (8)
Fasten off with a tail and pinch the open end flat.
Legs (white) — make 2
Stuff as you go.
- Rnd 1: 6 sc into a MR (6)
- Rnd 2: inc x6 (12)
- Rnd 3: (3 sc, inc) x3 (15)
- Rnd 4 to 5: 15 sc (2 rounds) (15)
- Rnd 6: (3 sc, dec) x3 (12)
- Rnd 7 to 12: 12 sc (6 rounds) (12)
Fasten off with a tail.
Ears (white) — make 2
Leave the ears unstuffed. Soft ears flop nicely.
- Rnd 1: 6 sc into a MR (6)
- Rnd 2: (2 sc, inc) x2 (8)
- Rnd 3: (3 sc, inc) x2 (10)
- Rnd 4 to 9: 10 sc (6 rounds) (10)
- Rnd 10: (3 sc, dec) x2 (8)
- Rnd 11 to 12: 8 sc (2 rounds) (8)
Fasten off with a long tail. Flatten the ear and pinch the base so it will sit up against the head later.
Dress (blush pink)
The dress is a small tube finished with a ruffle. Slip it over the body before you sew the body to the head, so make it now and keep it handy.
The bodice is worked in joined rounds. Chain 24, then join with a sl st into the first chain to form a ring without twisting it.
- Rnd 1: ch 1, 24 sc around, sl st to join (24)
- Rnd 2: ch 1, 24 sc around, sl st to join (24)
- Rnd 3: ch 1, (3 sc, inc) x6, sl st to join (30)
- Rnd 4: ch 1, 30 sc around, sl st to join (30)
- Rnd 5: ch 1, 30 sc around, sl st to join (30)
Now the ruffle, which gives the skirt its flounce.
- Rnd 6: ch 2, 2 dc in each stitch around, sl st to join (60)
- Rnd 7: ch 2, 1 dc in each stitch around, sl st to join (60)
Fasten off and weave in the ends.
Putting Clover together
This stage decides whether she looks adorable or a little bit startled, and it mostly comes down to where the eyes and ears land. Go slowly.
- Embroider the face. With brown thread, add two small slanted eyebrows above the eyes and a little upside-down Y for the muzzle underneath. With pink thread, fill a small triangle nose where the muzzle lines meet. Knot off inside the head.
- Dress the body. Slide the blush dress down over the stuffed body so the ruffle sits low and the bodice covers the chest. A few hidden stitches will hold it if it shifts.
- Join body to head. Line the open top of the body up under the head and whip stitch all the way around with the body tail. Push a little extra stuffing into the neck before closing so the head holds itself up.
- Attach the ears. Set them near the top of the head with about 4 stitches between them, and sew along each pinched base so they stand rather than tip forward.
- Attach the arms. Pin them to the sides just below the neck, flat side in. Make sure they are even before you sew around each one.
- Attach the legs. Place them at the bottom front, close together, so she can sit, and sew around each join.
- Tidy up. Weave in loose ends and nudge any uneven face stitches into place with your needle.
Helpful tips and easy variations
- Switching yarn. If you do not have chenille, a worsted cotton or acrylic works too. You will get a firmer, slightly smaller bunny with crisper stitches, so move to a 3.5 or 4 mm hook to keep the fabric tight.
- Skip the safety eyes for babies. Embroider the eyes in black thread instead. It is the right call for any bunny going to a baby or toddler, and it looks just as sweet.
- Stop the head flopping. A drooping head almost always means the neck is under stuffed. Pack more fiberfill into that join before you finish sewing.
- Choose your ear look. Sewn flat against the head, the ears droop. Pinched and sewn upright, she looks perkier. Both are cute, so go with whichever you prefer.
- Build a little family. Once you have made one, a second bunny in a different dress shade, a tiny bag, or a flower on one ear are all simple ways to expand the set without learning anything new.
How to wash and care for your bunny
Hand wash in cool water with a small amount of gentle soap. Press the water out without wringing, reshape her while damp, and lay her flat to dry away from direct heat. Chenille often sheds a little at first and then settles after the first wash. If you used safety eyes, keep her out of reach of very young children.
Copyright and terms of use
This pattern is free for personal use. You are welcome to sell the finished bunnies you make from it, and a credit back to latifacha.com is always appreciated. Please do not copy, repost, translate, or resell the pattern text or photos as your own. To share it, link to this page instead of copying the steps. Reach me any time at contact@latifacha.com.
Frequently asked questions
What yarn is best for a plush bunny like this?
Soft chenille or velvet yarn gives Clover her cuddly, rounded look, which is why this easy crochet bunny pattern is written for it. Cotton or acrylic also work if you size down your hook, you will simply get a firmer, slightly smaller bunny.
Can a real beginner make this?
Yes. If you can work a magic ring, single crochet, increase, and decrease, you have almost everything you need. The only extra stitch is the double crochet on the dress, and it is one of the first stitches most people learn after single crochet.
How do I stop the head from flopping forward?
Stuff the neck more firmly. A floppy head is nearly always a sign of too little stuffing at the join between the head and body, so add extra fiberfill there before you sew it closed.
Is this bunny safe for a baby?
She can be. Leave out the safety eyes and embroider the eyes with black thread instead, which removes the only small part. Always supervise babies and toddlers with any handmade toy.
Can I sell the bunnies I make?
Yes, you are free to sell finished bunnies made from this pattern. Please keep the pattern itself, both the words and the photos, for personal use only, and link to the original page rather than reposting it.